Learn about LLLT (laser therapy) | Build your own Laser Device
Home of the Laser Messiah® -the World's Greatest Laser Helmet for Hair Loss
Learn about LLLT (laser therapy) | Build your own Laser Device
Home of the Laser Messiah® -the World's Greatest Laser Helmet for Hair Loss
Do-It-Yourself Introduction (Revisited!), Checklist, and how to determine how many diodes you need!
It really doesn't matter how you make your device LOOK just as long as it follows several principles! Check through this article to better inform yourself!
It really doesn't matter how you make your device LOOK just as long as it follows several principles! Check through this article to better inform yourself!
Hopefully you've already read the "Do-It-Yourself Introduction" and you understand that it really doesn't matter how matter make your device look, it just has to have several principles in order for it to operate as effectively as it can! This is true for both a standard laser brush/comb and a high-powered laser device.
Click that link for more details, but in summary... it has to be wired PARALLEL (not series), the diodes should be close together (this an opinion), the diodes should be as close to a uniform height above the scalp as possible, and you need to have the proper power supply/adapter. These are basic similarities that should be adhered to if you want the most effective device possible!
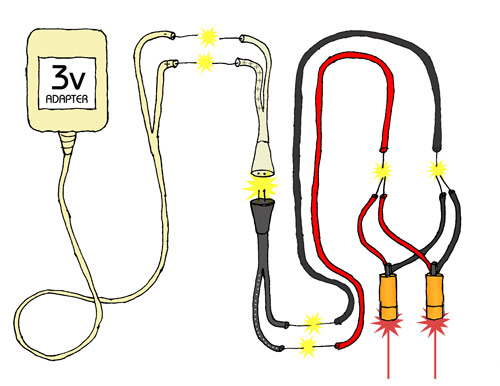
Also, if you haven't looked around at the site yet and are still curios as to HOW to wire these and the complexity involved, check out my page, "How ridiculously easy wiring is". You'll soon agree that wiring these diodes is very simple, and it's literally as easy as this picture:
So, now I think it's a good idea to put together a basic checklist to get your ideas better formulated and to get a basic tally of the items and supplies needed...
-Checklist for your Laser Device-
Thought Process:
1) Think up general design! Do you want a Laser Brush, Helmet, on have it rest on a stand that's over your head, etc.?
2) How many diodes do you want? Roughly, think about how much you are prepared to spend. Keep in mind, most clinical lasers have somewhere around 100, and we can get the diodes for $4.00 a piece (UPDATE... we get a much better deal now! See "AIXIZ LLC DEALS FOR CUSTOMERS ON THIS SITE! -A note from Dr. Charles E. Maricle" for more details). You already know that laser light is "dose dependent", so remember... within reason, the more the better (you need to read my essay so you will know what "within reason" means!). I have more details on determining the EXACT amount of diodes below via the "Tin Foil/Mesh Method".
3) Coverage: Are you going to make it cover the whole scalp at once (takes a lot of laser diodes, so it's much more expensive) or move it several times to get full coverage (obviously cheaper, but also more difficult to make a "hands free" contraption that does this)?
4) Do you want diffused or undiffused lasers? Diffused lasers cover more area, but the power also disperses so you have to use it a longer time.
Undiffused lasers are much stronger so you don't have to use them very long, but there ARE gaps in coverage... even when tightly clustered together.
Diffused vs. Undiffused (Dot!)
"Diffused" -you want this!"Dot" -not as good for laser therapy, and the lens cap takes away power! Cheap devices are "dot". You don't want that.
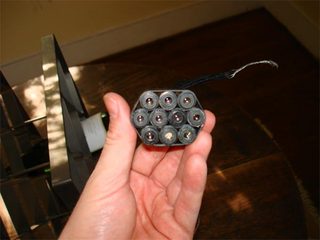
5) Cluster: a: Are you going to have the tightest cluster possible... electrical taped together, right next to each other? (Not recommended for a big area because those diodes are TINY and the costs will add up quickly) b: Are you going to use a mesh diode holder? (Recommended for diffused lasers, see more details below) c: ..Or are you going to drill holes in the helmet or brush to hold the diodes.
6) Determining number of diodes and cluster size by the "Tin Foil/Mesh Method":
Ok, so how the heck do you figure out how many diodes you need?? I'll describe the way I did it -which I refer to simply as the "Tin Foil/Mesh Method"- and remember, I used the "gutter guard" mesh with diffused diodes... if you do something different, I'm sure you can figure out how to apply this method to your design!
Here is the link to the mesh that most of us are using: Amerimax Home Products White Vinyl Snap In Gutter Guard The reason, of course, that we are using this is because the $4.00 8mm x 13mm diodes we use fit in them when you unscrew the lense! It's about a $1.50, and you find it usually in the far back corner of the store, past the lumber, where the gutters are.
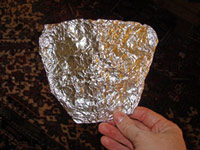
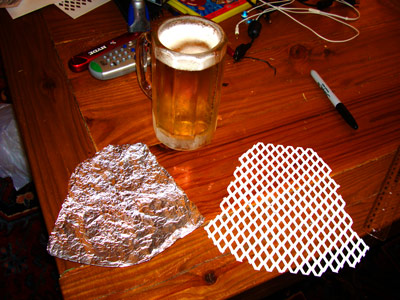
First of all, you get tin foil and bend it over the balding areas on your scalp to make a covering "mask". I used tin foil because it's easier to work with than paper, and it holds it's shape much better. The design ends up curved, of course, but flatten it out here for this part. Later, you are going to use the frame to curve the cluster to better fit your scalp, or it's going to rest on bristles and it will end up being curved on it's own.
Obviously, everyone is going to have a different shape. Well, I have aggressive temple loss that is always attempting to progress into a full-blown horseshoe, so I wanted to cover the complete TOP of my head. I don't seem to have much hair loss, if any, on my crown. However, I did extend the end to cover that area just to make sure it stays that way! By the way, if you can't tell, the wider end of the tin foil is the front/temples and the narrow end is the back/crown.
This step is actually a little harder than it looks, and you will see what I mean when you are doing it! By the way, I did extend the sides of the mask out a little into my non-MPB zones (once again, just to be sure), but you have to be careful when you are doing this because -depending on the size of your treatment area- you could be adding a LOT of extra diodes. Yes, I feel that does make it more effective, but it also makes it more expensive!
Ok, this next step is only if you are making a MOVEABLE cluster, one that doesn't give full coverage at once -which I recommend against for several reasons: 1) you'll inadvertently have overlapping areas, and 2) there seems to be a "synergy" when you stimulate a larger area at once. I haven't seen anything that proves it, but that's an educated guess based on the success of full coverage devices vs. handhelds. So, if you can afford a full coverage device, go for it!
Basically, in this step, I simply determined a shape that would cover the area if I moved it three times. Simple, huh!
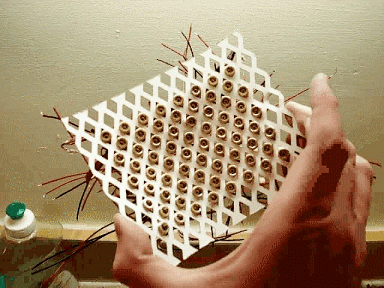
Finally, I put the piece of paper under the mesh so I could mark the area of the mesh that would actually hold diodes. Then you just count number that you need to fill those holes! It's as easy as that.
You'll be very surprised how many diodes take up a small area. Just to recap... I have 68 diodes in a 4" x 3" area, and if I wanted full coverage -if I made the mesh the same shape as that piece of tin foil up there- it would jump to 210! ...which is something that I WILL construct one day!
When you cut the mesh, don't forget that you will need to leave some room on the sides to affix it to whatever frame or holder you decide on...
I simply used thumbtacks on the sides to mount it to the wooden frame. Remember, it's always better to make your device as easy and as "non-permanent and forgiving" as possible! Also, as you see, the frame is curved to fit the contours of my scalp a little bit better.
Obviously, this is what the mesh would look like had I chosen to make a full coverage device (which I *will* make in the future)...
This is how I determined that fact that I would need 210 diodes for full coverage! Yes, I superglued two sections of the gutter guard together to make it big enough.
SOLUTION FOR PEOPLE THAT DON'T HAVE A NEIGHBORHOOD HOME DEPOT!
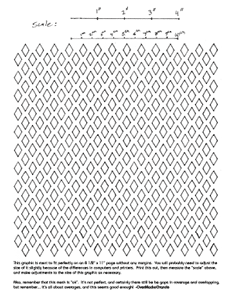
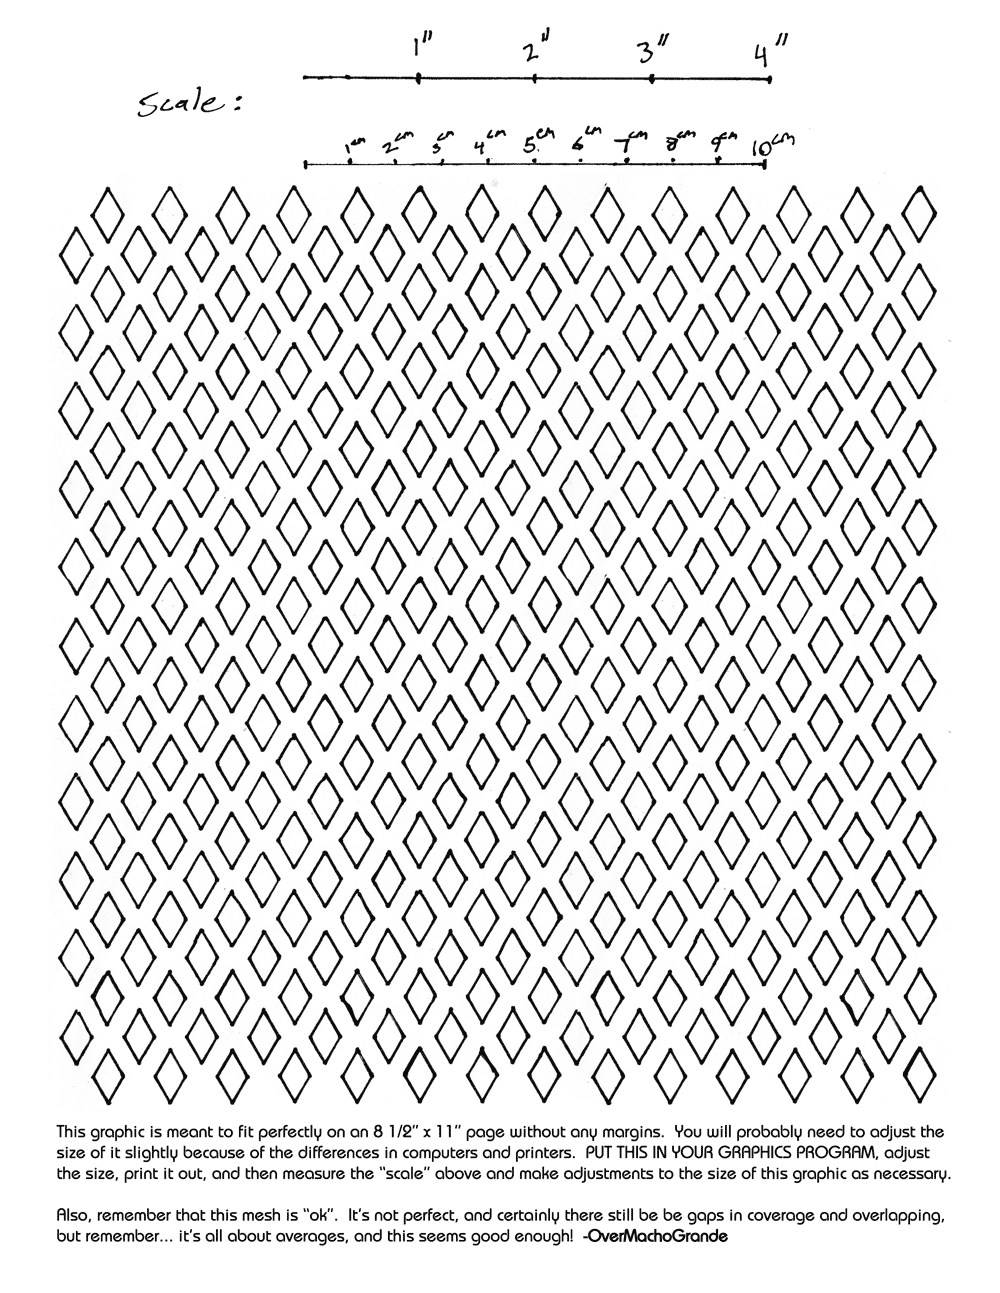
Ok, for all of you peeps out there that don't have a neighborhood Home Depot but want to arrange your diodes like most of us do-it-yourselfers have done, I decided to make a template of the mesh that you can print out!
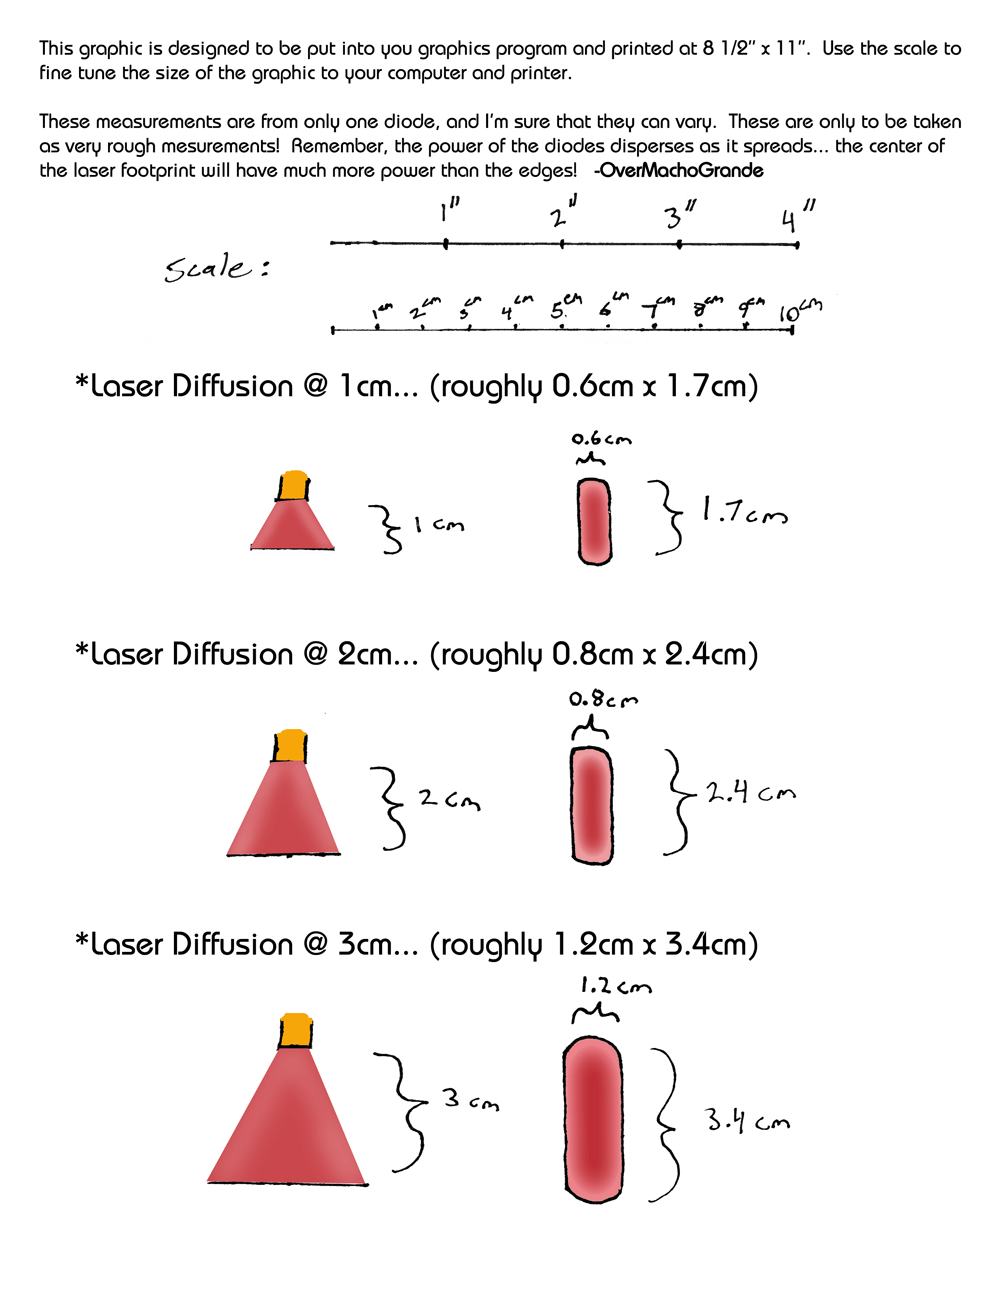
Yes, you will probably waste a good few sheets of paper doing this. What you have to do is first set it so that the graphic fits perfectly on an 8 1/2" x 11" piece of paper. So, don't print this out straight from your browser! Save it, PUT IT IN YOUR GRAPHICS PROGRAM, adjust the size, print it out, then get your ruler or measuring contraption to compare it to either the inches or the centimeters in the "scale" section. Obviously, if the scale measurement is too short, increase the size of the graphic and try again until you get it right.
Then you'll use a hole puncher or a drill or whatever to put holes in whatever diode holder you are using (completely up to you).
Remeber this... this mesh spacing isn't perfect by any means. There is overlapping, there are little open spots, but it seems to be good enough, and it is "vertically spaced" closer than it is "horizontally spaced" which is better for how our diodes diffuse (in a rectangle with much smaller vertical height).
So there it is, and this should take care of the "how far should I space them" questions! I haven't printed this out and I'm probably not going to anytime soon, so let me know if there are any problems!
-O.M.G.
...But I still want to know how much "diffused diodes"... DIFFUSE!
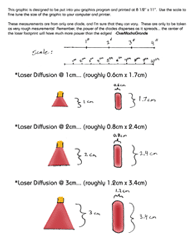
While the "gutter guard" printout up above helps those that don't have access to a neighborhood Home Depot have a mesh pattern similar to ours, this printout will help you if you just want to see the rough size of a diffused diode at the heights of 1cm, 2cm, and 3cm... perhaps for a custom mesh holder, maybe a new design that's going to put all of ours to shame, or perhaps just to satisfy your curiosity as you are anxiously awaiting to get cracking on your high-powered laser device!
Important, though... remember that while increasing height of the diode increases the coverage area, it drastically reduces power and therefore increases coverage time! More on that in my laser calculations page!
This has the same instructions as before... it's meant to be saved to your computer, PUT INTO YOUR GRAPHICS SOFTWARE, printed out at 8.5" x 11", and fine tuned by comparing your measuring device with my "scale". DO NOT just print this out from your web browser!
DISCLAIMER: I only had one diode to do this with. Obviously, there could be differences in each diode! Also, remember that the power of the beam is stronger in the middle and lessens towards the edges. As far as I know, there is no way to really gauge that, so once again it's a ballpark estimate! Therefore, I personally don't mind a little overlapping of the edges because chances are it's only helping to "even out" the power.
All in all, 2cm seems to be a pretty good height for diffused diodes, and they have a good "time factor", too (20-30 minutes will put you somewhere in the 4-6 joule range). Also, a quick note... In my laser calculations, I previously figured the size of the diodes at a 2cm height to be about 0.5cm x 2cm. Well, as you can see, the measurements I got at this time are more like 0.8cm x 2.4cm. I still think those original calculations are fine because the "fringes" do get pretty weak.
And, on top of that, it's close enough for me! When I develop the laser calculations section more and you see how things like scalp reflectability and the distance from the diode to the follicle play into the power... you'll say "close enough", too!
I hope this helps to answer the multitude of questions that I get asking "How much do diffused diodes actually diffuse?".
Adapter/Powersupply:
1) Specs of the adapter you need: An adapter/powersupply has two components that you are interested in... the volts and the amps. The laser diode will specify what it needs in each. For example, my laser diodes say they are 3.2 volts. Now... can I find an adapter that gives exactly 3.2 volts? Probably not... but the 3 volt adapters seem to work just fine.
In fact, others have told me that they work on 5 volt adapters as will without any problems. I don't have a clue whether or not that is true, or whether that will cause the diodes to burn out faster, BUT... I know that my 3 volt adapter powers 3.2 volt diodes just fine!
I'm not sure about this either, but I believe these diodes have built in circuitry, and I think they regulate the current somewhat and that protects them a little. Hey... I said on PAGE ONE that I don't know anything about electronics! lol...
With amps, you need to find out the number of milliamps the diodes have (mine, the AiXiZ diodes, have 30mA... you'll need to find out from the manufacturer how much yours have if you use a different brand), then multiply that number by the number of diodes.
For example, my Laser Helmet 1.0 has 68 diodes, so I needed an adapter that had at least 2040 milliamps, or 2.04 amps.
Finding a power supply with enough amps to handle a lot of diodes can be tricky. Check the "Power Supplies" for the most recently updated information.
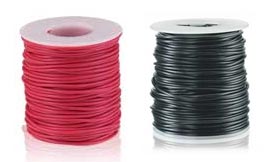
2) Adapter parts: Your adapter is going to have a funky end on it, but we need it to fit in the "plug" that we have on our laser device. So... this means that you need to get a "matching set". Radio Shack has a matching set that you can use for hobby products, so what you will do is cut the end of the adapter CLEAN OFF, and affix the Radio Shack part to the end. The wires coming from adapters consist of only a positive and a negative wire (just like our diodes), so this is easy to do.
Here are the Radio Shack parts, each for about $4 a piece: 1)"Replacement Adaptaplug Socket": This is the part that you attach to your snipped adapter wire. You just strip all of the wires back, and attach them together by twisting and electrical tape!
2)"Hobby Power Leads Adaptaplug": This is the part you attach to all of the wires of your laser device! You may need to strip back a lot of the wire on this since you might have a ginormous twisted mass of wire that you have to wrap it around.
If you get it from Radio Shack, the black wire is more "solid" than the red... that's fine.
2) Wire Strippers:
You have to strip the ends of the diode wires and the adapter plugs, and the wires are so thin that it's an "art", but you'll get better with practice and soon be a pro! These are usually pretty expensive (pretty close to $20) so if you don't already own this and you are looking to make something really cheap, this could be a deterrent... That's what I get for using third party image hosting for some of these!
3) Needle-nose pliers:
I started using these after I mistakenly pulled out a diode wire when I was stripping it. I hold the wire near the base with the needle-nose pliers with one hand, and I pull the wire stripper to strip the diode wires with the other. That's what I get for using third party image hosting for some of these!
4) Diagonal Cutters:
Most wire strippers will cut the wires as well, so I suppose this is optional. That's what I get for using third party image hosting for some of these!
5) Electrical Tape:
Sure, you can solder all of the wires together, or even use some sort of a wire terminal I suppose, but I just twist the wires together tightly (make sure the bare end that you stripped is long enough to twist a lot of wires together) and use electrical tape to secure and insulate. Maybe this isn't a completely PERMANENT solution, but I haven't had any problems yet... even in the high humidity of the Southeast!
These are all the basic needs for performing the wiring on the diodes and adapter!
What else is needed...
Well, of course, the diodes! Check the "Diodes" link on the sidebar for the most current info on those.
...And obviously, you need the supplies for whatever "holding device" you are going to create (brush, helmet, etc., etc., etc...) Obviously, there are too many options to cover that here, so check everyone's instructions in the "Do-it-yourself" section of the sidebar. Be creative, be resourceful... and if you have any questions, ask us in the forums! We're always floating around there.
The Laser Messiah is the ONLY DEVICE that follows the best principles and key concepts of laser therapy / LLLT for hair loss! Also, it's the only laser helmet that is fully-customizable, upgradeable, and user-serviceable!...why would you want anything else?!
Email me for pricing and options at omg@overmachogrande.com today! This is my PASSION, and I have extensive experience with many other treatments as well (as shown with my "Laser Enhancement Protocols"), and together we can really hammer down a great regimen! Let me hear from you!
Absolutely unsurpassed coverage and performance --PERIOD.
This is going to be THE. HOTTEST. SECTION. on this site! It's the section that you will come back to and check often!
My helmet is the best, but there are things you can do to make the best EVEN BETTER. I've been giving these to my customers for years via email (and you can email me for them if you are a customer and don't have a copy!), but it's time to make public multi-media presentations for them!
Enjoy this picture while it's up, ha ha --it'll go away when I have the section finished! :)
People are more conscious about health effects the "unseen" waves around them -particularly EMF radiation and Wi-Fi. So, all those laser diodes up on your head must be generating a lot of electromagnetic fields, right??
WRONG! The brunt of EMF radiation is generated at the POWER SUPPLY! Don't wear the power supply on your head and you are fine!
Don't wear the power supply on your head, and you'll be fine! :)
Think L.E.D.s are as good as laser therapy/LLLT for Hair Loss? DEAD WRONG. L.E.D.'s are indeed useful for skin and health -and probably show some merit against hair loss- however, it is *not* the same thing as explained in my blog entry.
It takes REAL LASERS to make a profound impact on hair loss for several very real reasons explained in this article!
"Whenever LED and lasers have been compared in studies (13 studies found), laser has come out on top." Jan Turner @ www.laser.nu
The TIME you use it each session depends on the device --I know EXACTLY how long to use the Laser Messiah II. ...But how many TIMES A WEEK is a little bit more flexible!
Here are the guidelines and the more recent conclusions that I've come to based on hearing from hundreds and hundreds of my customers (and my own experiences!).
Please note that I'm talking about REAL laser therapy device --professional ones, my Laser Messiah II, etc.! Not the mass-marketed CRAP out there!
The World's Greatest Laser Helmet for Hair Loss can now be yours! Fully-wired, a DIY KIT, or just the "helmet only" --email omg@overmachogrande.com for details!
The Laser Messiah is the ONLY DEVICE that follows the best principles and key concepts of laser therapy / LLLT for hair loss! Also, it's the only laser helmet that is fully-customizable, upgradeable, and user-serviceable!...why would you want anything else?!
Email me for pricing and options at omg@overmachogrande.com today! This is my PASSION, and I have extensive experience with many other treatments as well (as shown with my "Laser Enhancement Protocols"), and together we can really hammer down a great regimen! Let me hear from you!
Absolutely unsurpassed coverage and performance --PERIOD.
This was my original article from 2009 announcing that I was making the Laser Messiah II! This has great comparisons between the Laser Messiah I (the one you build with the free instructions) vs. the Laser Messiah II (the one I build, and the greatest laser helmet for hair loss that has ever been created!).
Check it out!!!
This is the helmet that totally BLEW AWAY the Laser Therapy Industry! To this day, there is still NOTHING that compares!!!
 First of all, you get tin foil and bend it over the balding areas on your scalp to make a covering "mask". I used tin foil because it's easier to work with than paper, and it holds it's shape much better. The design ends up curved, of course, but flatten it out here for this part. Later, you are going to use the frame to curve the cluster to better fit your scalp, or it's going to rest on bristles and it will end up being curved on it's own.
  Ok, this next step is only if you are making a MOVEABLE cluster, one that doesn't give full coverage at once -which I recommend against for several reasons: 1) you'll inadvertently have overlapping areas, and 2) there seems to be a "synergy" when you stimulate a larger area at once. I haven't seen anything that proves it, but that's an educated guess based on the success of full coverage devices vs. handhelds. So, if you can afford a full coverage device, go for it!
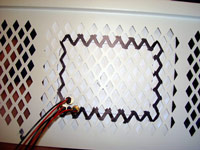 Finally, I put the piece of paper under the mesh so I could mark the area of the mesh that would actually hold diodes. Then you just count number that you need to fill those holes! It's as easy as that.
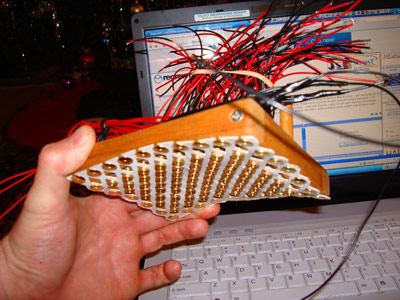
 While the "gutter guard" printout up above helps those that don't have access to a neighborhood Home Depot have a mesh pattern similar to ours, this printout will help you if you just want to see the rough size of a diffused diode at the heights of 1cm, 2cm, and 3cm... perhaps for a custom mesh holder, maybe a new design that's going to put all of ours to shame, or perhaps just to satisfy your curiosity as you are anxiously awaiting to get cracking on your high-powered laser device!
 While the "gutter guard" printout up above helps those that don't have access to a neighborhood Home Depot have a mesh pattern similar to ours, this printout will help you if you just want to see the rough size of a diffused diode at the heights of 1cm, 2cm, and 3cm... perhaps for a custom mesh holder, maybe a new design that's going to put all of ours to shame, or perhaps just to satisfy your curiosity as you are anxiously awaiting to get cracking on your high-powered laser device!

.jpg "The World's Greatest Laser Helmet for Hair Loss")
.jpg)
.jpg "EMFs and Laser Helmets")
.jpg "Lasers vs. LEDs -there is no competition!")
.jpg "Calendar of Laser Therapy Usage")
.jpg "Additional Common Coverage Patterns of the Laser Messiah II")
.jpg "PulseDrive Introduction Video")
.jpg "Common diode patterns for the Laser Messiah II")
.jpg "The Laser Messiah II works WORLDWIDE!")
.jpg "The laser helmet for hair loss that changed the world")
.jpg "Fitting Instructions for the Laser Messiah Video Screenshot")
Comments (0)
Login | Register