SUPPLIES: Build your own power supply by modding an ATX! -Complete instructions by Hapyman
Looking for a great power supply for a Laser Helmet/Device, but only have access to ATX power supplies? Well, this article is FOR YOU!!!
Looking for a great power supply for a Laser Helmet/Device, but only have access to ATX power supplies? Well, this article is FOR YOU!!!
Note from OMG: This is fantastic, and I truly feel that my site is almost complete now. As you may or may not know, finding a power supply with the proper voltage and enough amps to power a lot of laser diodes can be very hard. They often are out of stock, and they are even harder to find internationally.
Modifying a computer ATX power supply is *definitely* the route that I think most people should take if you know that you are going to have over 80 diodes. It's not expensive, they surpass the power requirements, you can get them in any country that sells computer parts, and although I haven't attempted to make one, these instructions are fairly straight forward. I really don't think that this would be hard at all with these great instructions. Plus, you have the advantage of tremendous "headroom" with the amout of amps available (just in case you aren't running as "tight of a ship" as you think).
Although I haven't built one, I've been USING ONE since August that Hapyman was kind enough to make for me, and it's worked perfectly! Insanely bright diodes -even when all three zones are running simultaneously- tell me that everything is running great. Ok, enough talk... here's the tutorial! -O.M.G.
Mod Your Own Power Supply for Cheap - Tutorial.
This has been a long time coming but because of multiple jobs it has been on the back burner.
With these instructions you will be able to take a cheap old computer supply and turn it into a laser power house. This may not be for everyone so proceed at your own risk. However, if you are a DIYer and would like to save some money and the hassle of ordering from TRC, then welcome.
Advantages: Lots of power for cheap, Customizable, and built in safety features (multiple heat-sinks, cooling fan, short-circuit protection... etc.)
Disadvantages: Time obtaining supplies and constructing.
If you want to print out these instructions or save them to your computer, here is the pdf version: Build Your Own Power Supply - Downloadable PDF
1. Power Supply - Find a working computer supply in an old computer or on eBay for under $10 w/ shipping.
2. Tools - I highly suggest having a wire stripper/crimper because it will speed up the process but I guess you could get by with a good set of needle nose pliers, wire cutters, or even a razorblade (I don’t really suggest this one).

3. Connectors etc
4. Electrical Cord - This will run from the supply to your device so go as long or short as you would like. If your power supply goes above 10 Amps I suggest getting a 12 gauge power cord otherwise your cord can get hot and melt. I bought a 6 foot 12 AWG (gauge) cord from home depot and just cut off the ends. (See the note at the end this page for a link to a blog entry discussing this).
5. Electrical Meters (optional): If you want to test the reliability of your setup when you are finished it would be nice to have a multimeter (left) and a clamp meter (right) to measure the voltage and the amperage respectively.
1. Make sure your power supply has been unplugged for at least 24 hours. This will allow any stored up energy to dissipate. (Or for those experienced you can run the resistor from a black to red wire to discharge the electricity from the capacitors. The resistor can get hot so use pliers.)
1. Remove the Screws
2. Remove the plastic connectors and the black plastic guard.
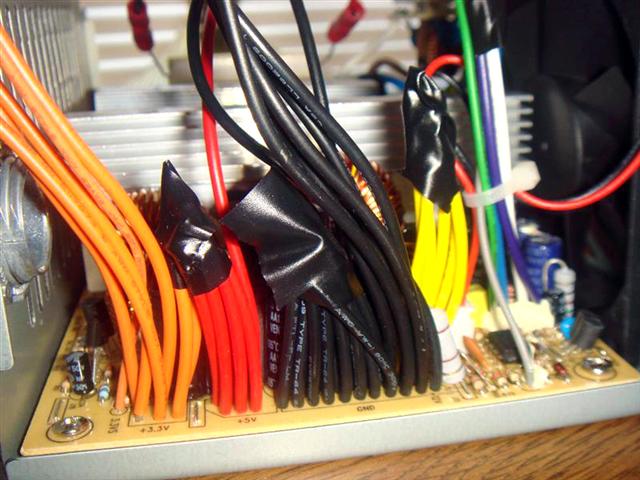
3. Cut off the plastic connectors at the ends and sort the wires.
4. Isolate the green wire and cut it down to about 3-4 inches and strip the wire about a half of an inch from the tip. You can then cut down the purple, white, blue and grey wire down to about 1 inch and cover them with electrical tape because we do not need these.
5. Take a black wire and cut this down to 3-4 inches and strip this one just like the green wire. Take one of the crimp connectors and use it to attach the green and black wire together.
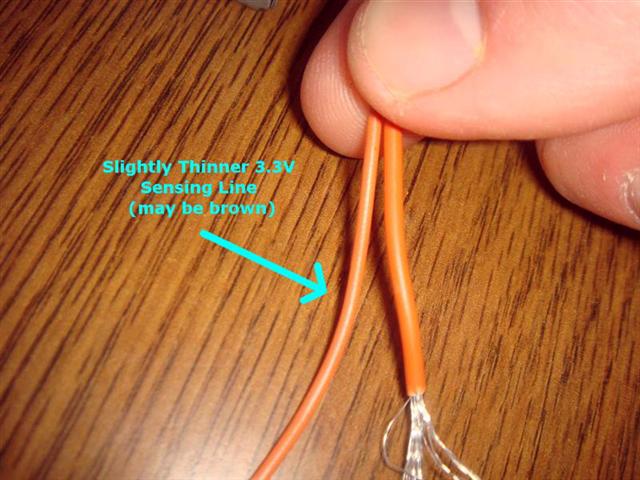
6. Find the 3.3V sensing line. It will be the thinnest orange wire or it will be brown. Here is a picture showing the difference in thickness but it does not do it justice... you will notice more of a difference in person. We will need this wire but cut it down to about 4 inches and strip the end.
7. Cut another 4 orange wires down to 4 inches and strip them. Cut the remaining ones down to 1 inch and cover them with electrical tape.
8. Cut one red wire down to 6 inches and cut the rest down to 1 inch and cover them with electrical tape.
9. Put aside 6 black wires and cut 5 of them down to 4 inches and cut the other 1 down to 6 inches. Cut the rest down to 1 inch and cover with electrical tape.
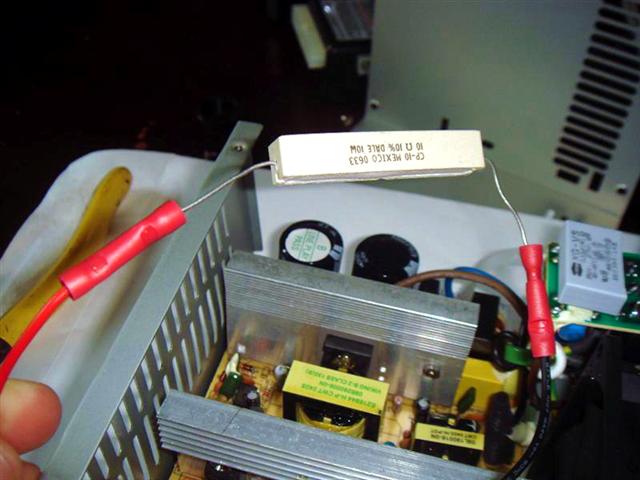
10. Attach the 1 - 6 inch BLACK wire to one end of the RESISTOR using one of the crimp connectors. Connect the other end of the RESISTOR to the 1 - 6 inch RED wire using the last crimp connector.
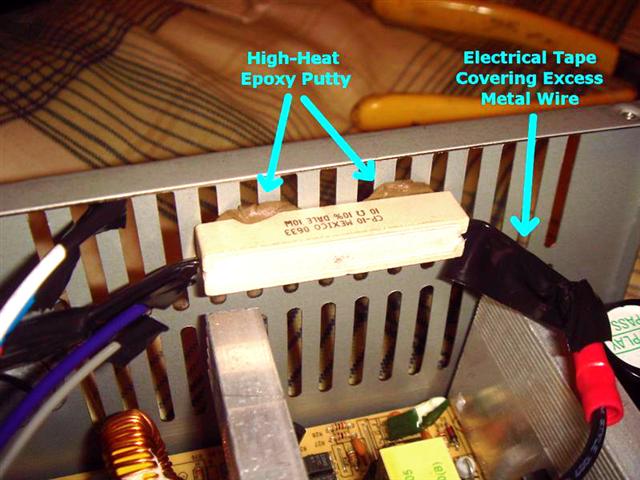
11. Glue the RESISTOR to a vented wall so it can be cooled while the power supply is running. Cover excess wiring with electrical tape.
12. Take the remaining ORANGE wires (including the thinner sensing line) and wire nut them to the WHITE wire from the cord you purchased. Then take the remaining BLACK wires and wire nut them to the BLACK wire from the cord you purchased.

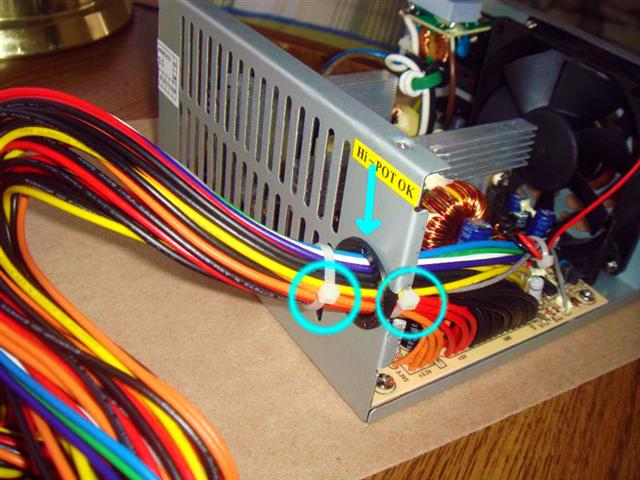
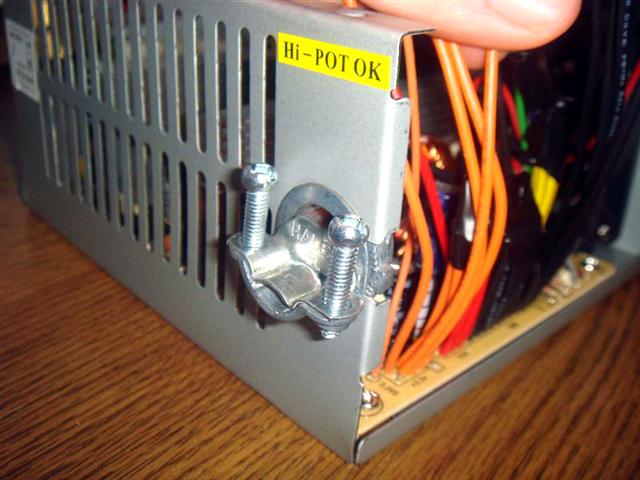
13. Use the clamp connector to secure the cable to the power supply. It fits snuggly into the hole that formerly held all of the wires.
14. This part is optional but recommended if you have access to the equipment and know what you are doing. I suggest you test at least the voltage using the multimeter. Also there WILL be a drop in the rated Amps. For example, mine are rated at 20 Amps but I am able to get about 15 Amps which is still plenty.
15. All that is left is to connect your main wire to the laser diodes using OMGs instructions and you’re off!
By Hapyman
Reigning Power Supply Expert...
...of OverMachoGrande.com
Another note: The instructions that Hapyman refers to about the main wire are located at "Re-introducing the “Hapyman” 15 amp power supply! …a computer ATX that you can modify YOURSELF!", and I describe how to use the cheapest source of long wire, thick wire available... an extension cord! Make sure your cord has enough amps and it will work great, and you can get one that is long enough -cheaply- so that you can move about freely.
-O.M.G.
Modifying a computer ATX power supply is *definitely* the route that I think most people should take if you know that you are going to have over 80 diodes. It's not expensive, they surpass the power requirements, you can get them in any country that sells computer parts, and although I haven't attempted to make one, these instructions are fairly straight forward. I really don't think that this would be hard at all with these great instructions. Plus, you have the advantage of tremendous "headroom" with the amout of amps available (just in case you aren't running as "tight of a ship" as you think).
Although I haven't built one, I've been USING ONE since August that Hapyman was kind enough to make for me, and it's worked perfectly! Insanely bright diodes -even when all three zones are running simultaneously- tell me that everything is running great. Ok, enough talk... here's the tutorial! -O.M.G.
Mod Your Own Power Supply for Cheap - Tutorial.
By Hapyman
December 4th, 2008
This has been a long time coming but because of multiple jobs it has been on the back burner.
With these instructions you will be able to take a cheap old computer supply and turn it into a laser power house. This may not be for everyone so proceed at your own risk. However, if you are a DIYer and would like to save some money and the hassle of ordering from TRC, then welcome.
Advantages: Lots of power for cheap, Customizable, and built in safety features (multiple heat-sinks, cooling fan, short-circuit protection... etc.)
Disadvantages: Time obtaining supplies and constructing.
If you want to print out these instructions or save them to your computer, here is the pdf version: Build Your Own Power Supply - Downloadable PDF
I. Supplies - You can find almost all of this at Radioshack or Home Depot
1. Power Supply - Find a working computer supply in an old computer or on eBay for under $10 w/ shipping.
a. Each laser we use takes up 30 mA (milliamps) of power. So if you want a device with 100 lasers we need => 30mA * 100 = 3000 mA (aka 3 Amps).
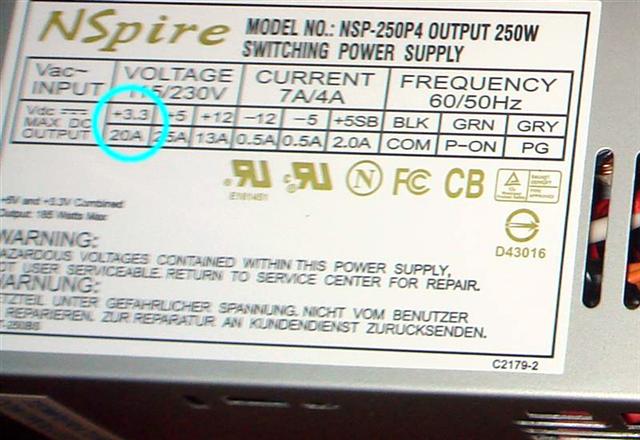
b. When you buy this supply make sure it will supply enough Amps for your planned device. I would recommend checking the label on the side of the supply (pictured below) because it will tell you the amount of amps. Most sellers on eBay will picture this or will do so upon request.
c. My 250 Watt power supply will give 20 Amps (20,000 mA) of power, which will support up to 666 lasers. However, before you buy a supply you must know that modding this configuration will cause a drop in the number of amps. For example my 20 Amp power supply only gives me about 15 Amps. So take this into consideration before buying.
2. Tools - I highly suggest having a wire stripper/crimper because it will speed up the process but I guess you could get by with a good set of needle nose pliers, wire cutters, or even a razorblade (I don’t really suggest this one).
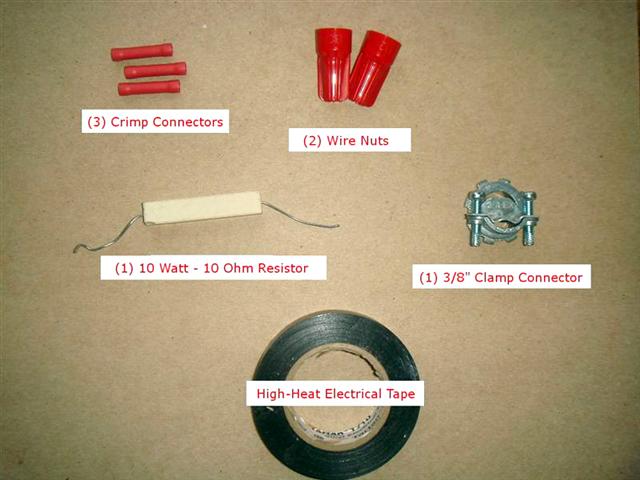
3. Connectors etc
a. 3 - Crimp Connectors
b. 2 - Wire Nuts
c. 1 - 10 Watt - 10 Ohm Resistor (found only at Radioshack so far)
d. 1 - 3/8" Clamp Connector (found only at Home Depot type stores so far)
e. High-Heat resistant electrical tape.
f. High-Heat Epoxy glue or putty (not pictured)
4. Electrical Cord - This will run from the supply to your device so go as long or short as you would like. If your power supply goes above 10 Amps I suggest getting a 12 gauge power cord otherwise your cord can get hot and melt. I bought a 6 foot 12 AWG (gauge) cord from home depot and just cut off the ends. (See the note at the end this page for a link to a blog entry discussing this).
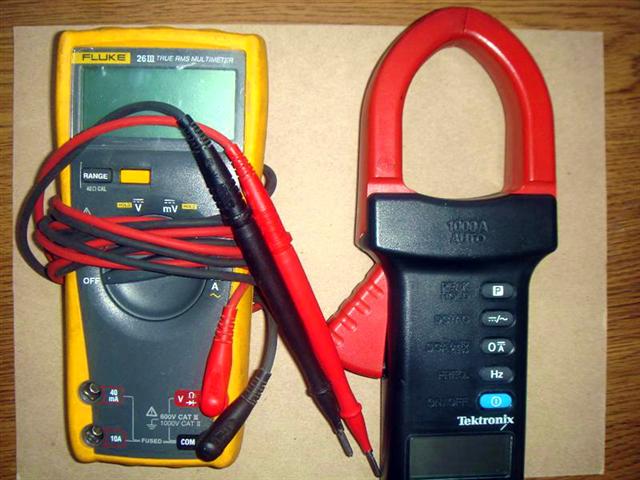
5. Electrical Meters (optional): If you want to test the reliability of your setup when you are finished it would be nice to have a multimeter (left) and a clamp meter (right) to measure the voltage and the amperage respectively.
II. Safety
1. Make sure your power supply has been unplugged for at least 24 hours. This will allow any stored up energy to dissipate. (Or for those experienced you can run the resistor from a black to red wire to discharge the electricity from the capacitors. The resistor can get hot so use pliers.)
III. The Fun/Easy Part
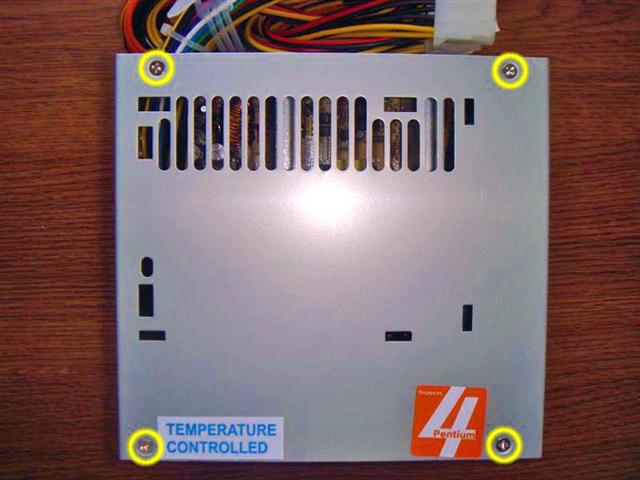
1. Remove the Screws
2. Remove the plastic connectors and the black plastic guard.
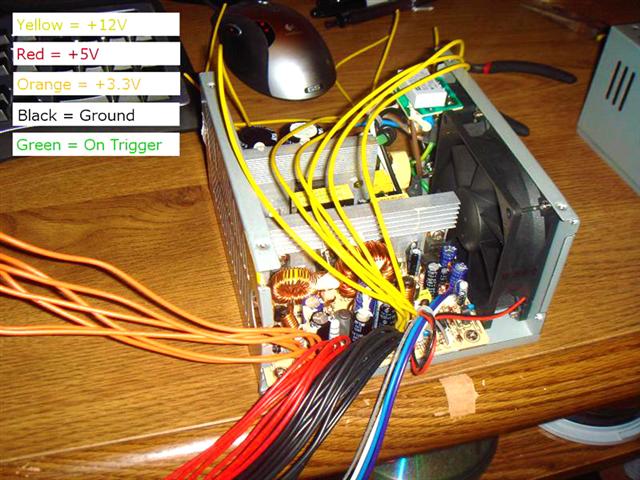
3. Cut off the plastic connectors at the ends and sort the wires.
4. Isolate the green wire and cut it down to about 3-4 inches and strip the wire about a half of an inch from the tip. You can then cut down the purple, white, blue and grey wire down to about 1 inch and cover them with electrical tape because we do not need these.
5. Take a black wire and cut this down to 3-4 inches and strip this one just like the green wire. Take one of the crimp connectors and use it to attach the green and black wire together.
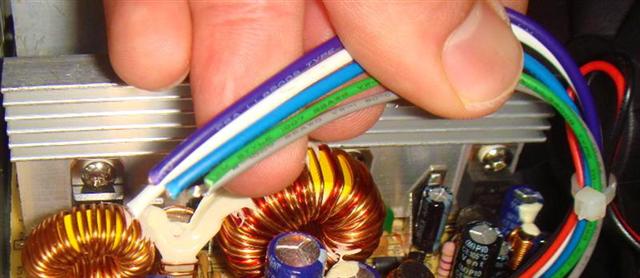
6. Find the 3.3V sensing line. It will be the thinnest orange wire or it will be brown. Here is a picture showing the difference in thickness but it does not do it justice... you will notice more of a difference in person. We will need this wire but cut it down to about 4 inches and strip the end.
7. Cut another 4 orange wires down to 4 inches and strip them. Cut the remaining ones down to 1 inch and cover them with electrical tape.
8. Cut one red wire down to 6 inches and cut the rest down to 1 inch and cover them with electrical tape.
9. Put aside 6 black wires and cut 5 of them down to 4 inches and cut the other 1 down to 6 inches. Cut the rest down to 1 inch and cover with electrical tape.
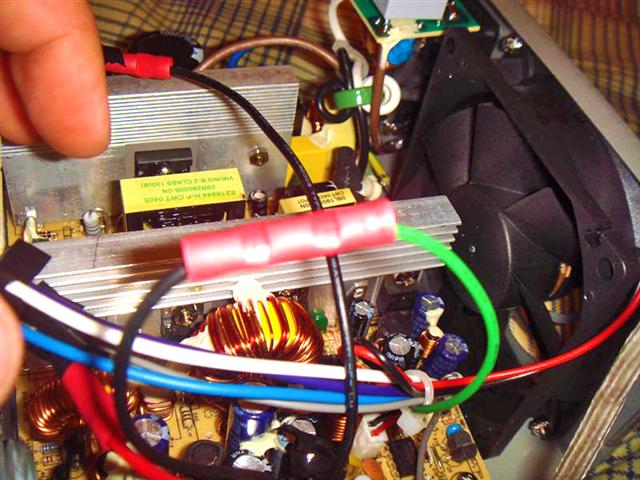
10. Attach the 1 - 6 inch BLACK wire to one end of the RESISTOR using one of the crimp connectors. Connect the other end of the RESISTOR to the 1 - 6 inch RED wire using the last crimp connector.
11. Glue the RESISTOR to a vented wall so it can be cooled while the power supply is running. Cover excess wiring with electrical tape.
12. Take the remaining ORANGE wires (including the thinner sensing line) and wire nut them to the WHITE wire from the cord you purchased. Then take the remaining BLACK wires and wire nut them to the BLACK wire from the cord you purchased.
13. Use the clamp connector to secure the cable to the power supply. It fits snuggly into the hole that formerly held all of the wires.
14. This part is optional but recommended if you have access to the equipment and know what you are doing. I suggest you test at least the voltage using the multimeter. Also there WILL be a drop in the rated Amps. For example, mine are rated at 20 Amps but I am able to get about 15 Amps which is still plenty.
15. All that is left is to connect your main wire to the laser diodes using OMGs instructions and you’re off!
By Hapyman
Reigning Power Supply Expert...
...of OverMachoGrande.com
Another note: The instructions that Hapyman refers to about the main wire are located at "Re-introducing the “Hapyman” 15 amp power supply! …a computer ATX that you can modify YOURSELF!", and I describe how to use the cheapest source of long wire, thick wire available... an extension cord! Make sure your cord has enough amps and it will work great, and you can get one that is long enough -cheaply- so that you can move about freely.
-O.M.G.

.jpg "The World's Greatest Laser Helmet for Hair Loss")
.jpg)
.jpg "EMFs and Laser Helmets")
.jpg "Lasers vs. LEDs -there is no competition!")
.jpg "Calendar of Laser Therapy Usage")
.jpg "Additional Common Coverage Patterns of the Laser Messiah II")
.jpg "PulseDrive Introduction Video")
.jpg "Common diode patterns for the Laser Messiah II")
.jpg "The Laser Messiah II works WORLDWIDE!")
.jpg "The laser helmet for hair loss that changed the world")
.jpg "Fitting Instructions for the Laser Messiah Video Screenshot")
Comments (0)
Login | Register