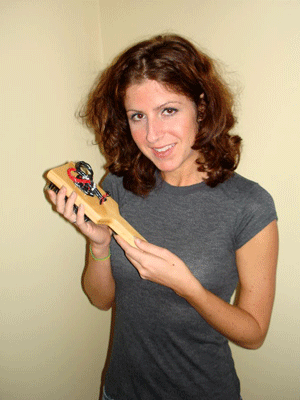
The Original Laser Brush Instructions
This is purely for educational purposes! We ALL KNOW that you are wasting your time and money without a FULL COVERAGE professional laser device like my Laser Messiah II!
This is purely for educational purposes! We ALL KNOW that you are wasting your time and money without a FULL COVERAGE professional laser device like my Laser Messiah II!
Don't waste your time and/or money on a cheap handheld device...
And don't kid yourself that these standard laser brushes are anything more than "toys"! Most of all, don't fall victim to any company selling these for hundreds of dollars! I can't put it any more simply than this... YOU NEED MORE DIODES THAN WHAT THESE BRUSHES HAVE.
Laser CLINICS ---> Great Results.
Laser CLINICS (and my Laser Messiah II) = MORE COVERAGE/MORE DIODES!
Got it? There are MUCH BETTER OPTIONS!!!

Listen, pay attention... I'm writing this note in mid-2008, and if you still think that a standard laser brush is the way to go, you are really out of touch! You really need to read my site more. However, nevertheless these are the instructions to my original homemade, do-it-yourself laserbrush from the page I made a long time ago.
If you insist upon a laser brush, do not waste your money on a Hairmax, or even an Amazing Laser Brush. The first one is a complete rip off (take a look at this thread by calo28 at Regrowth: "Inside Hairmax..."), and both of them are so underpowered that -at most- you will have poor results. Since I first posted these intructions, I have radically updated my site and included lots of other topics and thoughts about LLLT for hair loss, especially about how it's absolutely crucial to have the proper amount of power, so after you look at these instuctions... take a look around! Ok, here is the original page in it's entirety...
(By request, here are more detailed step-by-step instructions. I'm posting this at Regrowth, HairLossHelp, HairLossTalk, and on my personal webpage at overmachogrande.com/laserbrushinstructions. I check Regrowth the most often, but if you ask *me* any questions: IMPORTANT... I know nothing more than what I've written here! Lol... after this, you are on your own!) [UPDATE... ok, I know a LITTLE more now! lol...]
OverMachoGrande's Homemade Laser Brush
Non-Abridged Instructions!

Intro:
There are several cheap alternatives to laser brushes now, but if you've ever considered making your own for whatever reason... this is how I made mine. Sure... there are a trillion different ways to do it, but I'm only giving instructions on how I made MINE! And mine is a 10 laser brush -with a 3x4x3 pattern- running at 4.5 volts with a homemade wooden brush part.
Also, don't ask me what the total cost is. It was somewhere around $50 I think, but it might have been less for me since I had most of the proper tools I needed, etc. Just look at the items needed below (and I've included links to the adapter, the "Hobby Power Lead", and then and you can figure that up yourself, and whether or not it's worth it to make your own.
In my learned knowledge of this, there really are only two things that MUST be similar with all of our homemade laser brushes: [UPDATE: I've changed it to four, and they can be found on the "Do-It-Yourself Introduction" page.]
1) No matter how many lasers you use, you must AT LEAST use 5mW, 650nm red lasers! This is the standard to reach the depth of the hair follicles, which are 5mm under the surface of the skin. The 650nm wavelength will penetrate to a depth of 8-10mm, so that ensures stimulation. Also, some of the fancier commercial models use higher powered lasers (i.e. 20mW) and split them with mirrors, and I don't have a clue how to do that or what effect it has on the total power of the laser, so don't ask me!
2) The wiring is essential, and it must be wired "parallel" (all the positive [red] wires touch the positive wire coming from the adapter, and all the negative [black] wires coming from the lasers touch the negative wire coming from the adapter). "Series wiring" -or basically a daisy chain- is the wrong way to wire it, and will result in a decrease in the voltage for each laser, and although it may work... it will be underpowered!
If you've ever walked into a Home Depot and have some basic tools, it's very easy to make. With the wiring, I didn't use any soldering -only electric tape. Also, the only glue I used was for gluing the bristle pad onto the brush. I simple have the lasers shoved into the hole I made, which also means that if one goes out I can replace it that much easier.
NOTE: I'm not selling anything, including kits to do-it-yourself, I'm *not* committing copyright infringement by discussing something I made on my front porch for personal use (lol...), and I'm in NO WAY an expert on lasers, wiring, or electricity! And if you disagree with anything I say in this entire manual, I don't care!!!
Tools Required:
Here are all the tools I used to make mine. After looking through this list, you will be able to easily judge whether or not you can make your own at low cost...

1) Power Drill
2) Two drill bits... a really long, thin one and a wider one.
3) skil-saw
4) Sandpaper
5) Spray-on Finish
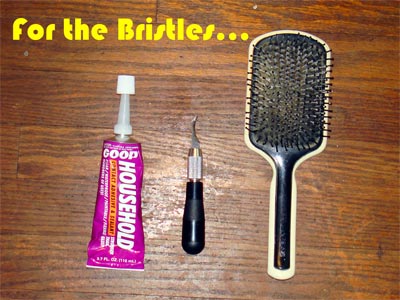
1) Household Goop, or any thick glue
2) Exacto Knife
3) Paddle brush (for the bristles only)
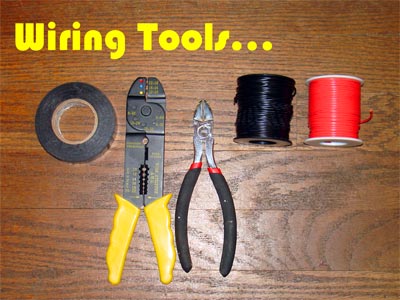
1) Electric Tape
2) Wire Stripper
3) Wire Cutter (redundant... the stripper also cuts!)
4) Black and Red wire (I got them from Radio Shack, and it's the thinnest they had)
These are the things you probably WON'T have laying around and actually have to buy. Also, I'm sure there are hundreds of sources for lasers and adapters you can use, but these are the locations I got mine...
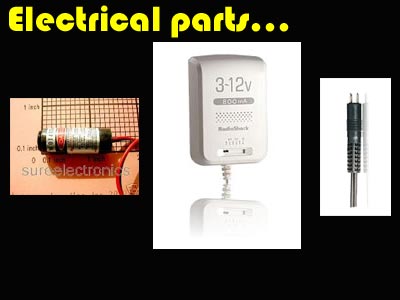
1) Lasers. However many 650nm lasers (with wire leads) as you want. I got mine from eBay from a Chinese company called "sureelectronics" for $0.99 a piece. Shipping is pretty steep, though. Just search "5mw 650nm laser", sort by LOWEST PRICE, and you'll get a bunch of listings from them like "High brightness 5mW 650nm RED laser pointer", and they look like the picture up above. I don't have any thoughts about any other lasers, these are just the ones that I chose. [UPDATE: Check the "Laser Diodes" page in the "Supplies" section for some current good places to buy them.
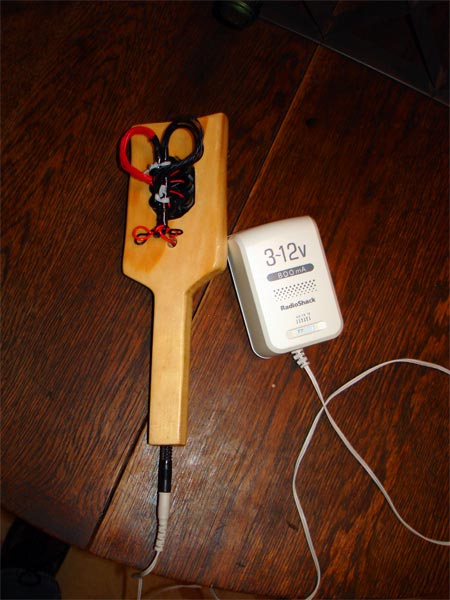
2) Adapter. The adapter I used is from Radio Shack, and it is the "3-12VDC/800mA Regulated AC-to-DC Adapter." The lasers indicate that they run from 3 volts to 4.5 volts, and this adapter has both settings. The 4.5 volts setting is slightly brighter, and I've chosen to use this. Also, this adapter has an option for the...
3) "Hobby Power Leads Adaptaplug." This has a positive and a negative wire coming from the end that isn't shown in the picture (I sketch it later down below). We will attach the lasers directly to these ends and plug it right into the adapter! Neato!
Part One: Making the Wooden Brush
1) Cut the board:
Yes, you can just use a pre-made brush, but I didn't want to because I wanted to have paddle brush bristles and I didn't want to drill into plastic. Okay... get a board, and cut out a shape for the brush with the skil-saw. Make it whatever design you want... go CRAZY! Just make it wide enough for your rubber bristle pad.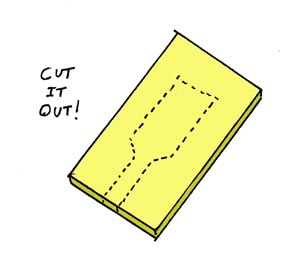
If I had it to do over again, I would have probably gotten a really good piece of oak or something, stained it (maybe ebony), and cut a fancier brush design... maybe like a PRS guitar headstock. How cool would that be?!
If you are like me, remember this... the nicer you make it look, the more pride you are going to have in it, and the more prone you are going to be to use it!
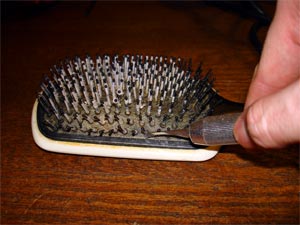
2) Use an Exacto Knife to cut the complete rubber "Bristle Pad" off of your comb.
This isn't the brush I used, but trust me... it's easy to cut and remove the entire thing right around the borders...
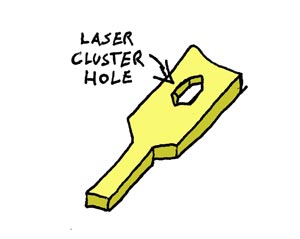
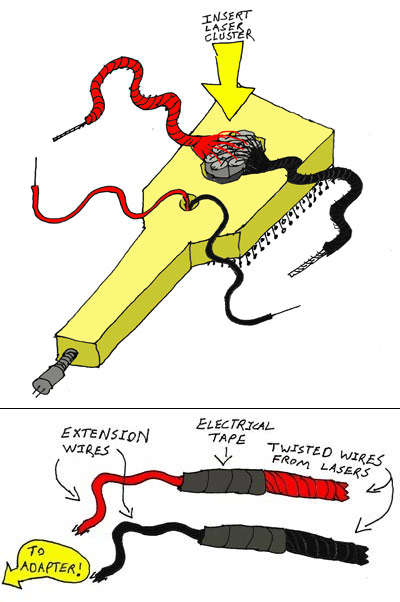
3) Cut the holes for the laser clusters in the wood and bristle pad:
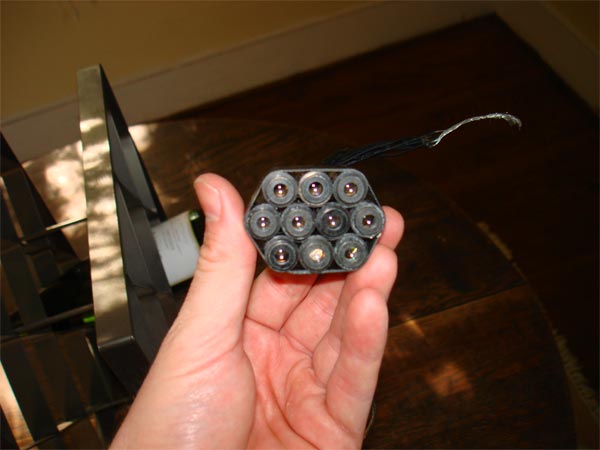
A: First you need to cluster your lasers together with electric tape like this (or whatever pattern you want):
B: Then trace the pattern on the center of the wooden brush and cut it out with your skil-saw the best way you can! Here is a sketch of the hole on the wood:
4) Drill the holes for the wire.
This is absolutely optional, but I wanted to hide the cord.
A: First, I used a really long, skinny drill bit (mine was 3/16" and about a foot long... just make sure it's thick enough to be able to fit two wires with some electrical tape, but not too thick to make the handle really weak) to drill all the way from the end of the handle to the cluster hole. Yeah, this was one of the hardest parts, but I didn't mess up. If I had to drill a couple of more inches it probably would've broken the surface!

B: Next get a wider drill bit (I think the one I use is 5/16ths but I can't tell because it's worn away) to drill a hole in front of the cluster (in order to meet the other hole you just drilled so you can run the wires through). I didn't do this, but you can just drill straight through the whole brush if you want to because chances are the rubber bristle pad when glued to the bottom will cover the exit hole.
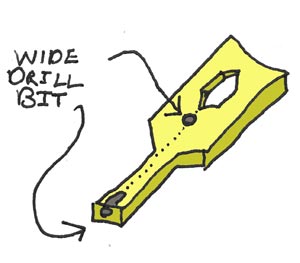
Then, I used the same drill bit to drill the end of the handle about an inch or whatever so I could shove the end of the hobby adapter lead in (we'll cover this in the wiring section).
5) Do the finishing steps on the wooden part.
This includes sanding, staining, spraying a finish on or whatever you want to do. Obviously this is completely optional, too. I sanded the heck out of it, and then sprayed a bunch of thin coats of high-gloss spray lacquer on it. It has a cool, deep finish that way that makes it look a little like a guitar finish.
If you're like me... this was the most PAINFUL PART! Having to wait for the lacquer to dry enough to get to next step was torture!
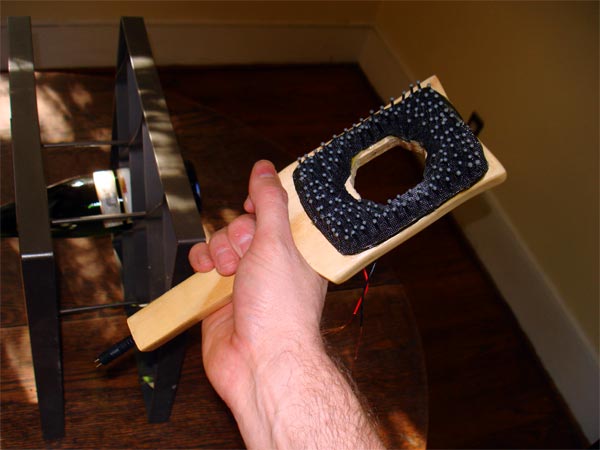
6) After the finish is ready, glue on the rubber bristle pad to the bottom.
I used "Household Goop" and lots of it because the bristle heads sticking through the back side of the rubber have a lot of texture, so in order to make it lay flat I really had to goop it on. Yes, that rubber cement smell will fade away (so will the lacquer smell for that matter).
Here is a picture of the bristles glued on to the wood (and ignore the wires and the "adaptaplug" you see. That comes later)...
You've finished the brush part!
Part Two: Wiring the adapter and lasers.
1) Wire the "Hobby Power Leads Adaptaplug".
I don't have a picture of the what the lead looks like when you get it, but here is a sketch...

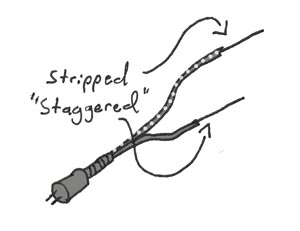
There are positive and negative BARE wires that extend from the hobby power lead. Unfortunately, the wire wasn't long enough to fit all the way through the handle, and the bare ends needed to be stripped more anyway. Therefore I made an extension chord for the two wires.
A: First, I stripped the ends of the positive and negative wires from the "Hobby Power Lead." I did this STAGGERED, like in the diagram below, so that when I used electric tape to cover the bare wire, they wouldn't be right next to each other possible making them too thick to go through the hole that runs through the handle.
B: Next, I made positive and negative extension wires with really long bare ends. I connected them to the "Hobby Power Lead" by simply twisting them together and covering them with electric tape. It was as simple is that.
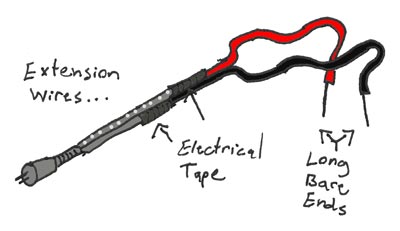
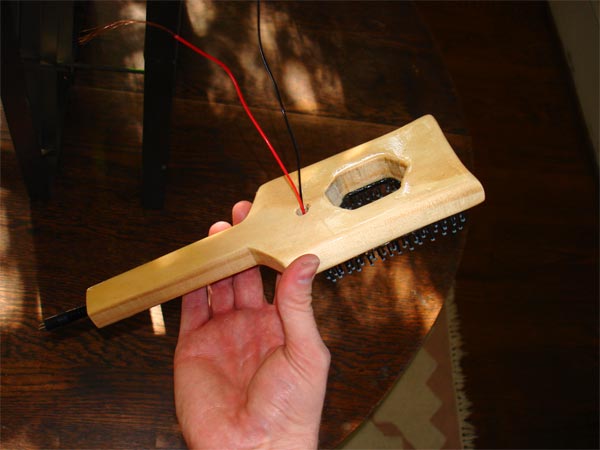
C: Finally, run the newly-extended "Hobby Power Lead" contraption all the way through the hole and out of the top hole. This was actually pretty hard, lol... Finally I succeeded, and here is what it should look like at this point:
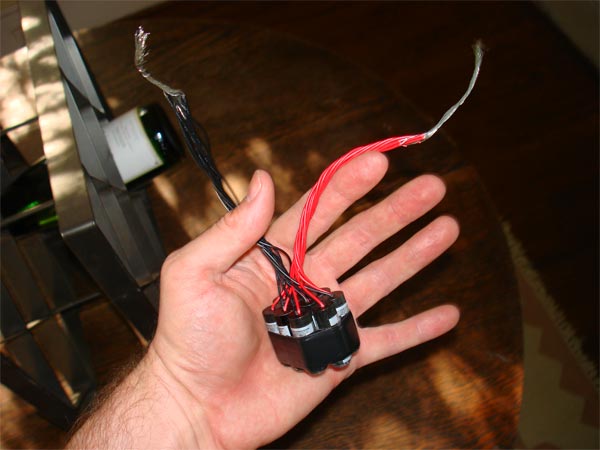
2) Strip and group the positive and negative wires of the laser cluster:
The lasers had some sort of adapter head at the end of the wires, but I snipped that off so I could have bare positive and negative wires. I was lousy at stripping them at first, but I got better by the time I did my 20th strip! Make sure you make a LONG BARE SECTION, because you are going to twist all of the positives together and all of the negatives together, and you want to make sure that you have plenty of exposed copper so they all get power. This is what it should look like:
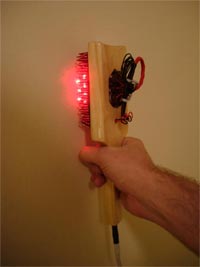
3) Shove the laser cluster into the hole on the brush:
Yeah, you might have to either wrap more electric tape around it for a tighter fit, or sand and cut a little bit if it's too tight. Mine fits in very snuggly, and I'd say that the lasers push through the hole enough so that they are about ¾ of an inch from the surface of the scalp. I don't think a little more or less matters one bit. IT'S A LASER BEAM! It's going to be almost exactly the same potency and size when you shine it across the room, so I think a fraction of an inch is essentially meaningless. That's common sense telling me that and not any scientific experiment, by the way.
4) Connect the grouped red and black wires from the cluster to the corresponding wire from our extended "Hobby Power Leads Adaptaplug."
This is easy... just twist and tape with electrical tape the same as you did before! Red to Red, and Black to Black! Remember, I used really long bare ends of the wires to make the twisting easier and more thorough.
5) Make the wires look pretty:
I just twisted up the excess "Hobby Power Leads Adaptaplug" extension wires, and I looped and used twisty ties on the laser cluster wires. Literally plug in the adapter and you're set!

THAT'S IT! Don't expect any bells or whistles or anything because it's completely silent. However, expect a feeling of accomplishment and pat yourself on the back because you...
...HAVE JUST MADE YOUR OWN LASER BRUSH!!!
For other suggested laser uses:

...A CAT TOY!!!
Stay tuned...
-O.M.G.
EMAIL OMG NOW!

.jpg "The World's Greatest Laser Helmet for Hair Loss")
.jpg)
.jpg "EMFs and Laser Helmets")
.jpg "Lasers vs. LEDs -there is no competition!")
.jpg "Calendar of Laser Therapy Usage")
.jpg "Additional Common Coverage Patterns of the Laser Messiah II")
.jpg "PulseDrive Introduction Video")
.jpg "Common diode patterns for the Laser Messiah II")
.jpg "The Laser Messiah II works WORLDWIDE!")
.jpg "The laser helmet for hair loss that changed the world")
.jpg "Fitting Instructions for the Laser Messiah Video Screenshot")
Comments (0)
Login | Register