The “Lemming” Hair Laser Helmet -by, of course, Lemming!
One of the more interesting and intricate of the Do-It-Yourself laser helmet designs of the Golden Area!
One of the more interesting and intricate of the Do-It-Yourself laser helmet designs of the Golden Area!


Some people look good with a shaved head -- I don't! In fact, I don't even look decent -- not even close! I look like a frickin' alien, which is why I feel the need to battle my thinning hair. I know, I know, looks aren't that important; it's what's on the inside that matters... Yes, I do believe that a person's character is most important, but why give in to this affliction when there IS HOPE? Why not battle hair loss successfully so that you can actually FOCUS more on the truly important things in life and not be so consumed with a shot self-esteem?
I joined the Regrowth community back in September of 2007, and had actually been a silent visitor for at least five months prior to joining. I really liked what this guy ImmortalHair was saying -- "go the natural route", which is what I'd rather do anyhow. I wanted to get off the propecia (with its sides and personal ineffectiveness), and with all the new knowledge, I was successful in doing so without any problems. But I still need more! I can tell I'm still thinning, which is why I am now interested in Low Level Laser Therapy (LLLT).
So how did I get involved with LLLT? Well, I remember occasionally reading on how someone was using a laser brush, and I just could not see how "mere light" could help in the battle to retain ones hair. Then one day I read OverMachoGrande's DIY laser helmet introduction, "As Mordred donned Golden Armor when he gave King Arthur his fatal blow...So will my Golden Laser Helmet slay the beast of hair loss", and I thought, "well I want to slay the beast of hair loss". From that point on, all the little lemmings in my head started to turn that stupid wheel (you know... the one that always squeaks and needs to be oiled).
Designs would come and go, and my ideas have changed from using pie plates to medical finger splints. I've taken apart lamps, ballpoint pens, lighters... walked around Lowes and Home Depot for hours, stared at this bike helmet for days... I wanted something that would be conformed to my head like O.M.G. was suggesting... so I thought, and I thought, and I thought -- until finally...
The Precious...

Supplies:
- 149 AiXiZ 650nm 5mW 8x13mm diffused laser modules
- powered by a MeanWell RS-35 series power supply (3.3VDC)
- equiped with a Ground Fault Circuit Interrupter
- 596 mW total power (@ 4mW output/module)
- mounts with a modified IronMan bike helmet
- mesh secured to helmet with adjustable stretch cord
- optional flex-bar supports
Specs:
- personalized to match the contours and thinning areas of scalp
- made from the rubber padding of 4 hair brushes
- 155 mounting holes designed to fit the AiXiZ 8x13mm diodes
- 2 cm bristles keep the mesh at a consistent distance from scalp
- bristles hold hair up, and out of the way (essential for those with longer hair)
- seams are sewn together for joint strength
- aluminum supports sewn in for contour integrity
Cost:
- Helmet plus other material - $56 (approx)
- Diodes - $596
- Power supply - $38 (with S&H)
- Mesh - around $20
- Total cost - just over $700


My instructions will be focused mainly on the diode holder, or mesh, and not so much on the helmet, though I will give you some thoughts on that. The reason I'm focusing on the mesh is because it is the single most important piece of my design. This is because the mesh is personalized -- meaning that it totally matches the contours and thinning areas of my head!


Having your mesh contoured to your head offers you the advantage of having a more uniform height, giving you a consistent delivery of joules. Therefore, you will not have to guesstimate on what areas are receiving about what amount of power.
So lets begin!
You will need...
1) a Forming Bowl for contours
2) a Thinning Pattern Template for shape
...plus these materials/tools:
- rubber padded hair brushes (as many as it takes)
- an exacto blade style knife w/extra blades
- 5/16" punch (or lens cap from above mentioned AiXiZ diode)
- liquid Nails adhesive (or similar rubber friendly glue)
- tile backer tape (or similar product)
- a sewing kit
- skills
Forming Bowl:
You'll need a sturdy Forming Bowl to give shape to your mesh.

**Process**
a. Form sheets of aluminum
b. Glue sheets together
c. trim
a. Form sheets of aluminum. To make my forming bowl, I took around 10-15 sheets of aluminum foil and individually formed them to my head - like a beanie. But make sure to individualy form the sheets of aluminum to your head first, before gluing them. If you glue them all flat first, and then let it dry it will be like taking a piece of steel to your head.
**note:** I had previously suggested that you can wear a cloth beanie or two while you form the bowl to give you a more accurate curve to the mesh (being that it will be raised about 2 cm off your head). I do not believe this is even necessary (though it wouldn't hurt to try). I didn't use it, and I don't know of anyone else who has. It was just an idea. You'll see that once the rubber mesh is complete, it is rather flexible and will automatically adjust to your head by either flexing out from the bristles/spacers, or flexing down because of the weight of the diodes. As long as the shape of the bowl is in the ballpark of your head you'll be fine.
-------------------------------------
b. Glue the formed sheets together. One of your best friends in this process is the adhesive (Liquid Nails, Goop, etc). Put a light, evenly spread coat of adhesive in-between each formed sheet, and then press together. Let dry for a few hours and then you can take a tennis ball and using light hand pressure, roll it around the inside of your bowl. This will further press and evenly spread the glue. Let dry for at least 24 hours.

**Now that I think of it, I used rubber cement for one of the forming bowls that I had made because I wanted to use it that day. It wasn't as strong, but it was cheap and dried quick enough for me to use later on.
-------------------------------------
c. Trim. Very simply... trim the rough edges. You can do this with scissors and/or by sort of folding the corners.
You will find that once sufficiently dried, your forming bowl will be rigid enough to work with yet moldable enough to where you'll still be able to constantly "re-form" it to your head as needed.
note: I'm sure you can use paper mache or some other similar material for the bowl, but just keep in mind that whatever is used must be rugged enough (plaster would end up crumbling for instance), and also be easily pierceable (putting holes in the bowl is essential in a later step). I will say that I am very pleased with how this forming bowl performed...
FYI: This forming bowl happened to be one of my original ideas for a helmet -- and would in fact STILL come out successful as a helmet. I had taken around three disposable aluminum pie plates and used the above method to form it. I was just going to put holes in it for the laser modules and bristles, then glue in the bristles and tack in the lasers with a bit of Goop or Liquid Nails -- which would be better than rubber cement (too weak) for a Pie Plate Helmet. Just imagine the picture of my forming bowl above being the ACTUAL helmet and mesh!! It would work!!

Pattern:
This will help you determine laser module placement on the mesh.

**Process**
- Form a single sheet of aluminum to thinning area
OverMachoGrande came up with this idea a while back. This is very simple to make and will give you a good idea as to where you need to place your laser modules on the mesh to match the thinning pattern. If you look at the image below, you will see a section of my mesh that is matching the template.
All you do is take a sheet of aluminum foil and form it to your head just like you would the forming bowl - except this time, you trim it to match only your thinning areas. You can do this by simply folding the edges. The aluminum is very easy to manipulate and it is best to do this while your hair is wet so you can see the thinning areas better.
By using this template, you will avoid placing laser modules in areas that don't need treatment.
Form the Mesh:
**Process**
a. Prepare mesh material
b. Cut out mesh sections
c. Cut module holes
d. Secure and glue mesh to forming bowl
e. Sew seams and aluminum supports
a. Prepare mesh material
So where do you get the material for the mesh? Check out the bathroom - Seriously! That rubber meshing is from about four hair brushes that I bought at Target. I barely made it by with four, and my guess is most will need about five or so. I used two rounded and two rectangular styles -- the biggest ones I could find. They averaged around $5 each. Obviously buy the kind that are the rubber "cushion" style!
 Figure 1a.
First, cut the rubber off the brush with your exacto knife, then remove the bristles (do not throw away bristles).
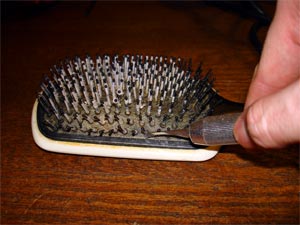 Figure 2a.
**picture taken form OMG's original laser brush instructions page**
note: Keep the bristles from your brushes. You'll need these later on for hair dispersment. I suggest that for each section of your mesh, you use the bristles that had come from the rubber that was used for that section. The reason is that (for me anyway) one style bristle may not fit well in the holes designed for another style bristle. I had bristles that would be too loose and sloppy in one area, and too tight in another. The bristles may also differ in length by only a butt-hair which can cause pressure points on the scalp. That is if the bristles are your sole means for height -- something that I do not recommend if you use a lot of lasers. The weight becomes too much!
b. Cut out mesh sections
I used an exacto knife to precisely cut 6 rubber shapes that would take the shape of my head when formed. Here is what the layout looked like,
 Figure 1b.
Again, I used 4 rubber padded brushes.
- piece 1: made from an oval brush
- piece 2: made from a rectangular brush
- piece 3: made from an oval brush
- piece 4a, b, and c: all came from 1 rectangular brush
note: You can cut the sections in any shape you want. This just happened to be how I did mine.
To cut the sections, you'll need to use your forming bowl plus template. The template is just inserted within the bowl (tape helps here) and helps you in determining the section for cutting. If you look at this image again, you'll see one of the sections matching the outer edge of the template. When you make cuts on the inside edges (where rubber meets rubber), the template needs to be within the bowl...
...just like this.
 Figure 3b.
Here is a close up. You can clearly see piece 2 overlapping piece 4a.
 Figure 4b.
Now you need to cut the rubber being overlapped -- but make sure to keep the two pieces pressed into your bowl to give the correct cut line.
 Figure 5b.
I did not fully cut through the rubber while in the bowl. I simply scored the overlap with my blade and then used a flat surface to finish the cut.
c. Cut module holes
The module holes are where your 8x13mm lasers are fitted to the mesh. The outside diameter of the laser modules are 8mm which equates to about 5/16 of an inch. The threaded portion is what fits into our rubber mesh. The picture below doesn't show it, but you'll see this when the cap is removed.
In this next image you can see that just the threaded portion of the module is fit snuggly into the rubber.
To secure the laser module into the mesh just replace the lens caps snuggly -- no need to over tighten!
 Figure 3c.
note: I removed the base of the lens caps with a lathe to allow more light to flow through. Compare the base of the lens cap directly above to the base in Figure 1c. This is not necessary to do but I had access to a lathe so why not...
This will effectively clamp and secure your lasers to the mesh.
 Figure 4c.
I've shown you this just so you can see how the lasers are held within the mesh. Obviously you'd secure them after you complete the forming process.
To cut out the holes I ended up using either the lens cap or a 5/16 punch along with an exacto blade. It had crossed my mind to try a paper punch but I thought that it wouldn't perform well with rubber. Nidhogge proved me wrong and was able to make his mesh with the paper punch. Make sure though that the holes that are cut or punched are not coming out oversized, because when everything is hooked up, those diodes will want to pop out of any oddly formed holes.
 Figure 6c.
Place cap/punch on the rubber and cut around it at a slight angle inward -- just about the angle of this backslash /. Keep using sharp blades, and it works best to kind of "pierce" around it first, then finish the cut with out the cap. Try it a few times on a piece of the rubber and you'll see what I mean...
I just eye-balled the hole placement and did not worry about the bristle holes. Let those fall where they may. To give you an idea of the spacing you can use the gutter guard material. Also, try not to have a hole cross a seam edge because the hole will end up out of round. You cut the holes in each piece of your rubber sections before gluing the sections together.
 Figure 7c.
After each hole you cut, it is a good idea to test fit the diode by placing the threaded portion in. Its easier to fix it right then and there instead of waiting 'till the end.
d. Secure and glue mesh to forming bowl
First, piece together your rubber sections into your forming bowl.
 Figure 1d.
 Figure 2d.
In the next picture, you'll see that before gluing, I fastened the rubber in the forming bowl with some rubber bands. This holds the shape while you glue and let dry -- it worked very well.
 Figure 3d.
This next picture will show where I will glue the seams. You can also see one of the rubber bands and how it is holding in the mesh. I put about a 1/2 inch of tile backer tape (found at Lowes) over the seams before I actually glued them together.
 Figure 4d.
I do not have a picture of the tape placed in before gluing, but here is one after the mesh had been glued. You can see the tape which gives strength to the seams before sewing.
 Figure 5d.
When you glue the seams make sure to squeeze the glue between the sections. I also placed a thin film of glue over the tape.
note: Do not over use the tape! Use only enough to support the sections before you sew them together. The reason is that you will obviously have to cut away any tape covering a module hole. 1/2 to 3/4 of an inch of tape is all you'd need, and only on the inside. There is no need to tape the outside of the mesh.
e. Sew seams and aluminum supports
Sewing the seams is essential, the aluminum supports are optional. If you do not sew the mesh seams, it will pull itself apart sooner or later (my first mesh attempt did). I used a standard needle and a thimble-like tool (the dimple on the cap of a pen) to push the needle through the rubber. Once you get the hang of it you'll see how simple this is. If you do not know how to sew -- learn!! It's simple!
The aluminum support came from some disposable barbeque grill material that I found for a dollar at a grocery store. I put in the supports to help the mesh retain its shape. I honestly do not think this is needed because the sewed seams keep the shape.
This is the support that the binder clips are holding onto (explained below in the mesh to helmet instructions).
Figure 2e.
Figure 3e.
This thing is extremely rugged once sewn together! I literally threw it against the wall a few times to test it out. I don't know of any decent alternatives to sewing...
That is basically it for constructing the mesh. All you need to do now is attatch the laser modules and replace the bristles. There may be spots where you would like to add bristles -- just use your exacto blade and "drill" a hole. It works well. Here is a picture that shows all the modules and bristles in the mesh before wiring. Gives you an idea of how well it fits. It truly is a *personalized* laserpiece!

Except for the front spacer which is taped around that front aluminum support, all the others are held on by a bristle or two. I just wrapped up some foam with electrical tape to where it was only slightly thicker (1 - 2 mm) than the bristles. Next I figured out which bristles would hold it to the edge, pierced the foam with a toothpick, and just stuck it onto the bristles. They hold it on very well, and if for some reason you need to remove it you can with no problems.
note: I suggest that when you make your mesh, plan on extending out the edges to allow for the foam spacers. I happened to have been fortunate to of had that front support and some room on the sides for the foam. The spacers are only on the edges and do not block any light from hitting my target areas.
Affixing the Mesh to the Helmet:
Here is just a brief description of how my mesh is fixed to the helmet. There are thousands of ways you can do this so let the creative juices flow...
The helmet I used is an adult sized IronMan bike helmet and it only cost me $16.
I took a hacksaw blade and cut off the top.
This picture may be a bit confusing at first so you'll have to study it well...
I just snaked that stretch cord through some rubber O-rings that I had sewn into the mesh on the front. The back just has two binder clips -- one on each side.

There are a total of 6 O-rings. Three on the left temple and three on the right.
The mesh actually just rests on the helmet base when it is not on my head. The stretch cord secures the mesh to the helmet so it doesn't fall off.
This is the adjustable headband that actually secures the helmet to your head.

That headband was the main reason I bought this helmet. All I do to secure my helmet to my head is twist that little knob in the back. It is just too simple! Righty-tighty, lefty-loosy... Many of the other styles had very similar headbands that adjust, but they were a bit tougher because they were latch types. I am sure you can find a decent helmet with a similar headband system.
This helmet was cheap, fits well, and has a great system to secure it. Still, if you can't find the exact one, you can make any helmet work...
I know that there is a lot to absorb here but... Do not be overwhelmed! Take it step by step and realize that you have plenty of flexibility. Use your imagination and creativity, and if you do not understand something just press on. Most of this stuff will make sense as you construct it anyway.
GOOD LUCK!!!
** Other than a few more updates and "house cleaning", this page is essentially finished! For my original quick instructions see my brief description. There has been some slight mods to it which are explained towards the end. Also here is the other thread that will help.
You can also view the original Lemming149D Laser Helmet introduction thread.

.jpg "The World's Greatest Laser Helmet for Hair Loss")
.jpg)
.jpg "EMFs and Laser Helmets")
.jpg "Lasers vs. LEDs -there is no competition!")
.jpg "Calendar of Laser Therapy Usage")
.jpg "Additional Common Coverage Patterns of the Laser Messiah II")
.jpg "PulseDrive Introduction Video")
.jpg "Common diode patterns for the Laser Messiah II")
.jpg "The Laser Messiah II works WORLDWIDE!")
.jpg "The laser helmet for hair loss that changed the world")
.jpg "Fitting Instructions for the Laser Messiah Video Screenshot")
Comments (0)
Login | Register