Learn about LLLT (laser therapy) | Build your own Laser Device
Home of the Laser Messiah® -the World's Greatest Laser Helmet for Hair Loss
Learn about LLLT (laser therapy) | Build your own Laser Device
Home of the Laser Messiah® -the World's Greatest Laser Helmet for Hair Loss
The Lasermax 50 on Steroids (How to add diodes to your Lasermax)! -by RosarioRose9
Fantastic mod for those common stand-type devices like the LaserMax that you see out there! This helps bring it closer to what we actually NEED for success!
Fantastic mod for those common stand-type devices like the LaserMax that you see out there! This helps bring it closer to what we actually NEED for success!
Note: This *definitely* deserves it's own spot in the Do-It-Yourself section! Great job, Rosario!!! -O.M.G.
THE LASERMAX 50 ON STEROIDS: Phase 1
Note: Phase 1 covers modding the Lasermax 50 to contain 135 diodes. These steps may also be used to mod the Lasermax 75 to contain 160 diodes, or the Lasermax 90 to contain 175 diodes. Phase 2, [NOTE: Phase 2 is now complete! Please scroll down] which awaits the arrival of some additional supplies I've ordered, will increase the diode count to 225 in the Lasermax 50, and will also substantially increase the coverage area. O.k, here we go...
Supplies needed:
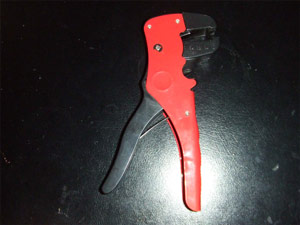
1. 'Automatic' wire strippers (see photo 1 below). These strip the wire perfectly every time, even if you're a klutz like I am, and are invaluable for stripping the relatively thin guage wiring of the diodes. They make the job quick, easy, and infinitely less prone to result in damaged wires or diodes.
2. Wire nuts.
3. Wire cutters or a razor blade.
4. Pliers - preferably needle nose.
5. Ruler or straightedge to lay out the 'grid' for the location of the diodes.
6. Drill bit (size: .31)
7. No. 1 and 2 Phillips head screwdrivers.
8. Super glue. This dries in 15 seconds, and greatly simplifies securing the lasers you'll be adding to the boxes.
9. Aixiz diodes as linked in OMG's supplies section. These are the exact same diodes as those used by Lasermax, and will yield a professional appearing result.
10. TRC power supply, also linked in OMG's supply section.
Procedure:
1. Using a #2 phillips head screwdriver, remove the (4) screws which secure the unit to the tripod.
2. Using a #1 phillips head screwdriver, open the two 'boxes' which enclose the diodes of the unit.
3. Remove the wire nuts from the wires, and 'un-twist' all of the wires so that they are no longer bound together. I know you don't want to do this as they look so tidy, but trust me, you HAVE to do it!
4. Disconnect the red on/off switch, and the power supply connections from the main box. You may choose to later reconnect the switch (assuming that it can handle the increased power of the modded unit - I'm not sure of that). I chose not to, so the unit turns on when I plug it in.
5. Save the Lasermax power supply as we'll be using it in 'Phase 2' when we exceed the power capacity of the TRC supply.
6. If you've decided to use diffused diodes (which OMG and I recommend, as it provides more 'solid' coverage), remove the existing diodes. They are held in place by a small amount of glue, and can be fairly easily popped out with pliers.
7. Using wire cutters or a razor blade, snip off the female screw receptacles located at the bottom inside the two boxes (see Photo 2 below). These are not used by Lasermax (make sure that you don't clip off the ones located higher up which are used!) and will interfere with the additional holes we'll be drilling for diodes.
8. Using a straightedge or ruler and a pencil, draw the 'grid' (see Photo 3 below) which will mark the location of the holes to be drilled. If you have one, a clear straightedge makes the job easier.
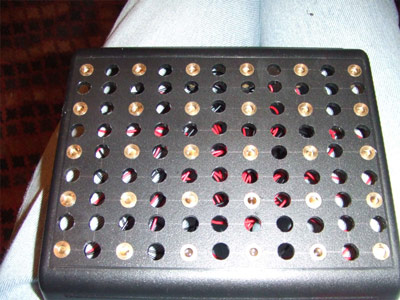
9. Drill small pilot holes where each of the new diodes will be installed. Then, using a .31 bit (the exact size of the Aixiz diodes) drill the holes for the diodes. While not essential, a drill press makes this task much, much easier and more precise. Your boxes will now look like this:
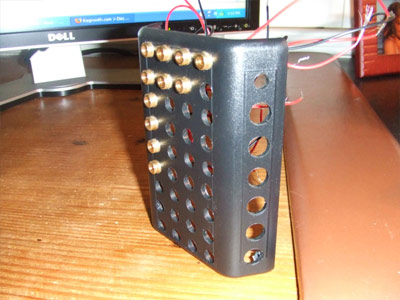
10. Drill ventilation holes on either side of the boxes (see Photo 6 below) - with 99 lasers in the overhead box, and 36 in the front one, the diodes tend to get rather warm! Be careful not to drill too close to the female receptacles for the screws which hold the top and bottom of the boxes together.
11. Remove the lenses from the diodes.
12. Strip the diode wires and install the diodes, using a single drop of Super glue for each diode. Wait 15 seconds for the glue to dry before moving on to the next diode.
13. Bind the red and black wires together in groups of 8 to 10 wires. This is called wiring in parallel, and will maintain the proper voltage for the diodes and the power supply.
14. Using 18 to 22 ga. Wire, attach a single 10" piece of wire to each of the groupings of red and black wires. Then attach all of the red" pieces together. Do the same with the black ones. These will be your 'leads.'
15. Use wire nuts to secure all the bundled wires.
16. Attach the red and black leads from the large box to the red and black ones from the small box. Use wire nuts to secure these. Then attach a six foot length of wire from each of these to the power supply as detailed on OMG's site.
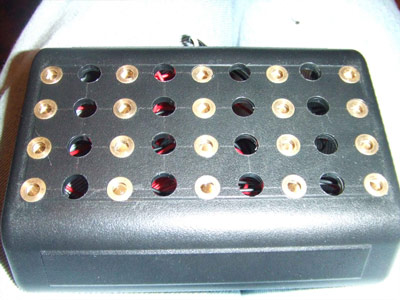
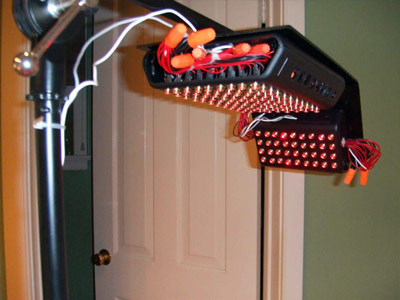
17. The box will now look like this:
18. You can either replace the 'end panels' of the boxes, or leave the panels out, allowing the wires to protrude. I've tried it both ways, and while leaving the end panels in place yields a cleaner looking finished product, I chose not to, since removing the panels allows the unit to run MUCH cooler, extending the life of the diodes.
19. Phase 1 of the mod completed. The entire top, back and front of your scalp will be totally bathed in laser light, with no gaps!! This puts to shame even the clinical laser units - and at about 1/50th the price.
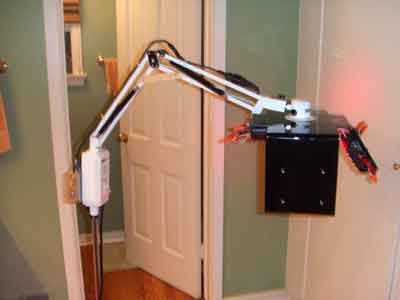
Phase 2... the completed product!
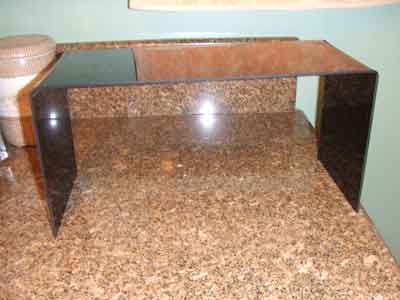
Here is the completed unit. The instructions for 'Phase 1' would apply to the construction of 'Phase 2', with the following thoughts:
1. The 'box' is, as I advised earlier, the Serpac A-31, available from numerous electronic parts suppliers. They manufacture the box in a variety of sizes. I chose this one because the added 'depth' allows for better ventilation;
2. I chose not to add a box for the back of the head because it turned out that the Phase 1 design provided coverage to a point about half way down the back of the head;
3. The side boxes are attached to a piece of black lucite (cost: $11.00) which measures 12" across the top, 7" on each side, 6" deep and 1/8" thick. I toyed with more exotic designs, but chose this one because of its simplicity and functionality;
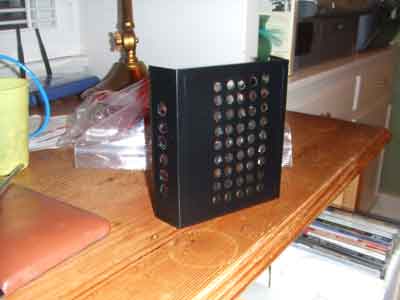
4. There are 5 rows, with 9 diodes in each row (total: 45) in each of the two boxes. This yields a total of 225 diodes, which are easily handled by the TRC power supply;
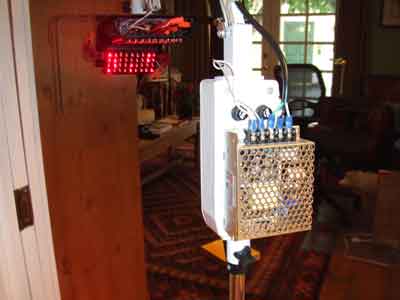
5. I went completely 'off the reservation' with the 'tripod' for this unit! LOL. It's a fully articulating stand (so I can adjust it to exactly the position required) used for a heating lamp. I picked it up from an accupuncturist for $10 because the lamp didn't work. It features a timer which controls the AC, and which will handle 250 watts - more than enough for our use. I attached the power supply to the stand (see Photo 5). So, I simply plug in the stand, dial in the treatment time, the unit powers on, and 225 diodes light up! At the end of the treatment a bell rings and the unit powers off. Pretty slick.
Had my first treatment last night, and my head is totally bathed in light.. So, we'll see what happens...
The Laser Messiah is the ONLY DEVICE that follows the best principles and key concepts of laser therapy / LLLT for hair loss! Also, it's the only laser helmet that is fully-customizable, upgradeable, and user-serviceable!...why would you want anything else?!
Email me for pricing and options at omg@overmachogrande.com today! This is my PASSION, and I have extensive experience with many other treatments as well (as shown with my "Laser Enhancement Protocols"), and together we can really hammer down a great regimen! Let me hear from you!
Absolutely unsurpassed coverage and performance --PERIOD.
This is going to be THE. HOTTEST. SECTION. on this site! It's the section that you will come back to and check often!
My helmet is the best, but there are things you can do to make the best EVEN BETTER. I've been giving these to my customers for years via email (and you can email me for them if you are a customer and don't have a copy!), but it's time to make public multi-media presentations for them!
Enjoy this picture while it's up, ha ha --it'll go away when I have the section finished! :)
People are more conscious about health effects the "unseen" waves around them -particularly EMF radiation and Wi-Fi. So, all those laser diodes up on your head must be generating a lot of electromagnetic fields, right??
WRONG! The brunt of EMF radiation is generated at the POWER SUPPLY! Don't wear the power supply on your head and you are fine!
Don't wear the power supply on your head, and you'll be fine! :)
Think L.E.D.s are as good as laser therapy/LLLT for Hair Loss? DEAD WRONG. L.E.D.'s are indeed useful for skin and health -and probably show some merit against hair loss- however, it is *not* the same thing as explained in my blog entry.
It takes REAL LASERS to make a profound impact on hair loss for several very real reasons explained in this article!
"Whenever LED and lasers have been compared in studies (13 studies found), laser has come out on top." Jan Turner @ www.laser.nu
The TIME you use it each session depends on the device --I know EXACTLY how long to use the Laser Messiah II. ...But how many TIMES A WEEK is a little bit more flexible!
Here are the guidelines and the more recent conclusions that I've come to based on hearing from hundreds and hundreds of my customers (and my own experiences!).
Please note that I'm talking about REAL laser therapy device --professional ones, my Laser Messiah II, etc.! Not the mass-marketed CRAP out there!
The World's Greatest Laser Helmet for Hair Loss can now be yours! Fully-wired, a DIY KIT, or just the "helmet only" --email omg@overmachogrande.com for details!
The Laser Messiah is the ONLY DEVICE that follows the best principles and key concepts of laser therapy / LLLT for hair loss! Also, it's the only laser helmet that is fully-customizable, upgradeable, and user-serviceable!...why would you want anything else?!
Email me for pricing and options at omg@overmachogrande.com today! This is my PASSION, and I have extensive experience with many other treatments as well (as shown with my "Laser Enhancement Protocols"), and together we can really hammer down a great regimen! Let me hear from you!
Absolutely unsurpassed coverage and performance --PERIOD.
This was my original article from 2009 announcing that I was making the Laser Messiah II! This has great comparisons between the Laser Messiah I (the one you build with the free instructions) vs. the Laser Messiah II (the one I build, and the greatest laser helmet for hair loss that has ever been created!).
Check it out!!!
This is the helmet that totally BLEW AWAY the Laser Therapy Industry! To this day, there is still NOTHING that compares!!!


.jpg "The World's Greatest Laser Helmet for Hair Loss")
.jpg)
.jpg "EMFs and Laser Helmets")
.jpg "Lasers vs. LEDs -there is no competition!")
.jpg "Calendar of Laser Therapy Usage")
.jpg "Additional Common Coverage Patterns of the Laser Messiah II")
.jpg "PulseDrive Introduction Video")
.jpg "Common diode patterns for the Laser Messiah II")
.jpg "The Laser Messiah II works WORLDWIDE!")
.jpg "The laser helmet for hair loss that changed the world")
.jpg "Fitting Instructions for the Laser Messiah Video Screenshot")
Comments (0)
Login | Register