Build the “Laser Messiah I” Laser Helmet for Hair Loss- Part II: Determining the Number of Diodes!
Step II of the WORLD RENOWN do-it-yourself instructions for the "Laser Messiah I" --Determining the Number of Diodes! This is a full-coverage PROFESSIONAL STRENGTH laser helmet / LLLT Device --and I teach you how to build it yourself!!!
Step II of the WORLD RENOWN do-it-yourself instructions for the "Laser Messiah I" --Determining the Number of Diodes! This is a full-coverage PROFESSIONAL STRENGTH laser helmet / LLLT Device --and I teach you how to build it yourself!!!
Like I've said before...
Determining the number of diodes you need is pretty easy. However, if you are going to make a helmet like the "Laser Messiah" and you haven't constructed it yet, it's safe to expect that your final diode count will be a little different. That's ok... I'll prove to you in the next set of instructions that it's REALLY EASY to add an additional few diodes to the whole shebang since we are using unscrewable "wire nuts"! You don't have to change the hierarchy or anything. So basically, don't be afraid to start work on the helmet just because you are short some diodes.There will be two sections in this... "Determining the Ballpark Number (before you've made your helmet)", and "Determining the Final Number (after you've made your helmet)". Obviously, if your design is different than the "Laser Messiah" and you are actually going to use the gutter guard as the diode holder (like I did with my first helmet), then Section 1 is all you need to do, baby!
The best way to do this would obviously be to build the helmet first, in which case you can completely bypass Section 1 and jump straight to Section 2, but obviously I'm aware that things happen -like "group buys", or simple impatience, or whatever!- and you want to go ahead and order the diodes before the helmet is complete. Well, start with Section 1 then! Rock 'N' Roll...
SECTION 1: Determining the Ballpark Number of Diodes (before you've made your helmet)...
Ok, I've said it before on my OMG site, on the last set of instructions, and on the forums: Gutter Guard isn't perfect! It's "good" to use for diode spacing, but it's not perfect by any means. There will still be both some overlaps and gaps in coverage. However, it is good, and it's close enough, and this is all about averages and long-term usages anyway, so I'm happy with it being the "standard spacing" for our diodes for our laser helmet projects.
Plus, you'll see that the diodes are horizontally spaced more than they are vertically spaced which is good because our diodes diffuse in a RECTANGLE, and not a square or a circle. That means that we can tweak them a little bit and orient them to maximize coverage even better.
So, in summary about the Gutter Guard, if you don't like the Gutter Guard spacing or feel that you've got something better... by all means use that instead! Ok? OK!
Don't have a Home Depot in your area? Don't want to leave the house to buy an 80 cent piece of plastic? That's ok, I've got you covered. ...Did you have any doubts?? lol...
Ok, lets go...
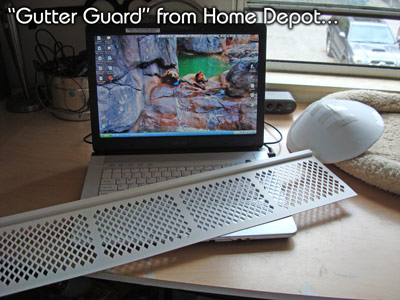
1) Get gutter guard, or PROPERLY print out my gutter guard document.
Gutter Guard is found at Home Depot, and it's usually in or close to the very back corner of the store in the lumber section. That seems to be the standard location of where they keep their gutter supplies. Man, it's as cheap as 80 cents per piece and you only need one!
Ok, the drawback of using actual Gutter Guard is that more than likely -because of the shape of the pattern you are going to end up with- you are going to have to glue some sections together. We'll cover than later, but I'm just saying that for this step it might be easier to just print out the printout (even though it's still easier to use the actual Gutter Guard in the first step of the instructions when you make the marks on the top of the helmet. What I'm saying is that it's probably better to have BOTH the actual Gutter Guard AND the printout!).
...And don't worry, I am going to give you very easy instructions for printing this thing out at the proper size! I realize that not everyone knows there way around everything having to do with graphics, and not everyone knows how to do a "Gargamel's Revenge" video like I did (although I really think that everyone can learn how to do that stuff really easily, too... I mean COME ON! Idiots in Hollywood do that crap, so you *totally* could! They aren't smarter than you, I promise.... they just have learned to use a computer program and they have learned how to add their own bit or artistic flair to it. It's *not* magic.).
So, if you don't have Gutter Guard or if you want to save yourself some gluing and want to print out the document, either go directly to ../../uploads/articles/do-it-yourself/mesh-printout.gif, or go to the first link in my "Do-it-yourself" section entitled "Do-It-Yourself Introduction (Revisited!), Checklist, and how to determine how many diodes you need!", scroll down to #6, and keep scrolling until you see this:

When you click on the graphic (or if you just followed the link directly), you will see this, which is the full page of the Gutter Guard print out:
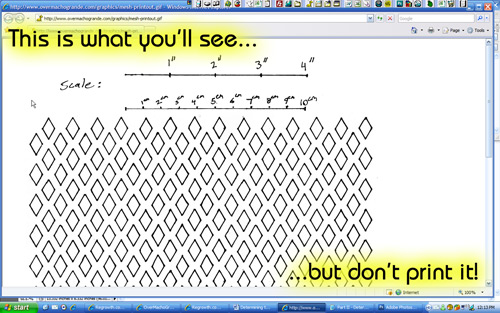
DON'T PRINT THIS OUT. The reason is because this graphic is designed to be a FULL PAGE (8 1/2" x 11"), and when you print it out directly from the internet, it'll shrink it down TOO SMALL:
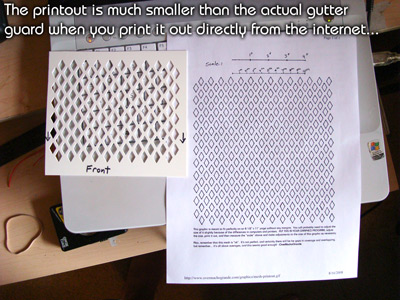
As you can (maybe) eyeball from that picture, the printed out mesh is much smaller that the actual gutter guard. If you can't tell that... just trust me. It's too small.
So, that means that we need to put it in a program to do it! I'm just going to assume that everyone out there either has Microsoft Word or Photoshop. If you don't have either on of your programs, I'm sure you can see what I'm doing and figure out how to do it yourself in whatever program you have!
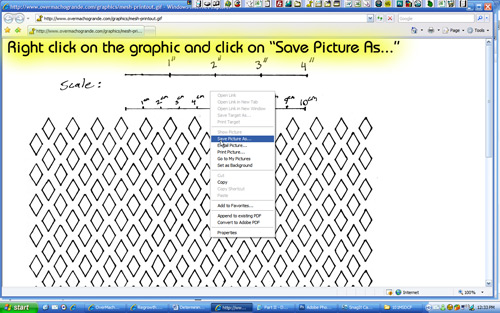
So, first, we need to save the graphic. I saved it to the Desktop so I could easily find it. Right click on the document and click "Save Picture As...":
Then save to the desktop:
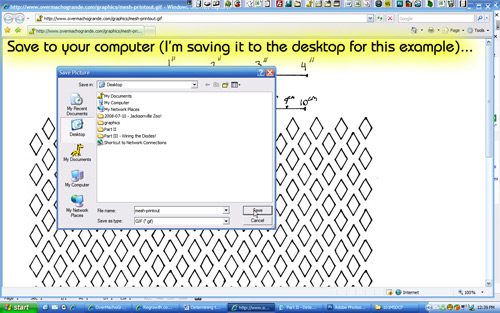
It defaults to "mesh-printout.gif", and that is fine and dandy!
USING MICROSOFT WORD TO PRINT OUT THE GUTTER GUARD PRINTOUT:
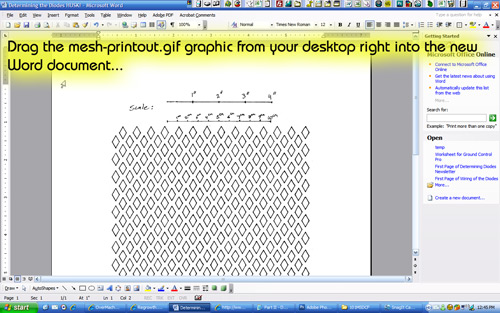
Ok, two options... the first is to put it in Microsoft Word. Open word, and just drag the graphic from your desktop and put it in a blank document, and you will get this:
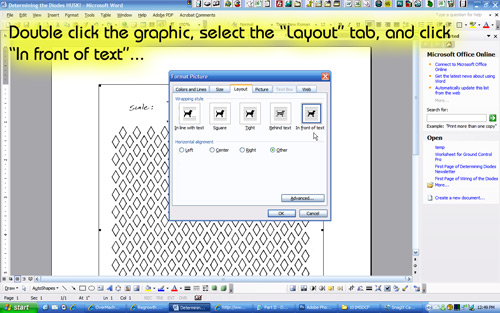
Now, we need to resize it to the size of the page, so we need to do a couple of things. Double click the graphic rapidly, and the "Format Picture" dialogue box will pop up. First, you will select the "layout" tab, and click the "In front of text" button...
Then, with the box still open, you will click on the "size" tab, and change the height to "11" (inches, obviously):
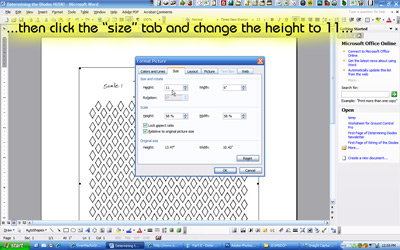
Then click "ok". As long as that "lock aspect ratio" check box is selected, you only have to change the height, and the width will change automatically.
So, you are left with this:
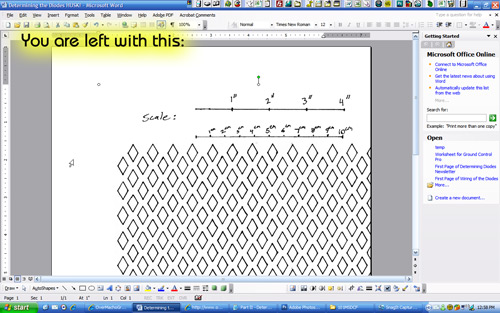
Obviously, you need to center the document now, so just drag it to where the graphic fits the page perfectly!
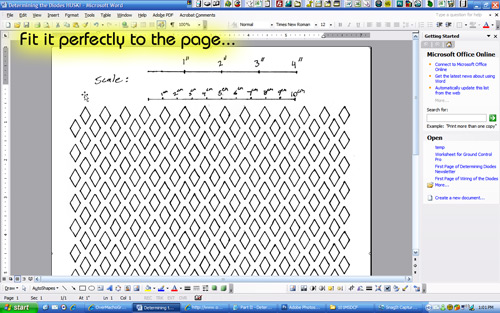
Then print it out, and WOAH! More than likely...
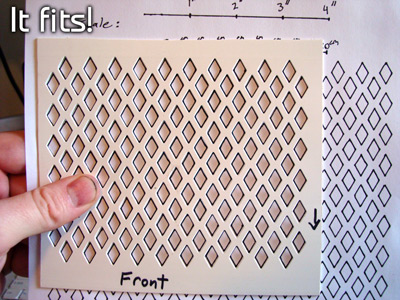
...it's the perfect size! If you don't have Gutter Guard to test it out, you can obviously test this out with a ruler (that's why I put the scale at the top):
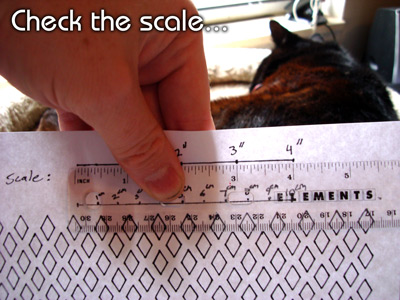
Ok, if for some reason it it's the right size, you can double click the graphic again and tweak the size either way, print it out, and check the scale again until you get it right!
Easy, huh?!
USING ADOBE PHOTOSHOP TO PRINT OUT THE GUTTER GUARD PRINTOUT:
Well, this is even EASIER! lol... If you have Adobe Photoshop, open it up, print it, check the "center image" button, change the height to "11", and print:
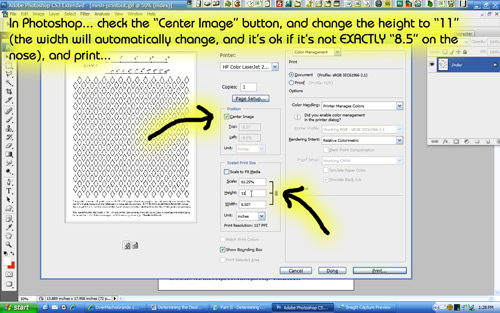
...And ignore any warnings about "clipping" that will occur. That's just the white margins!
Check the scale, adjust it if necessary, and you are set! ...And now you have a printout of Gutter Guard!
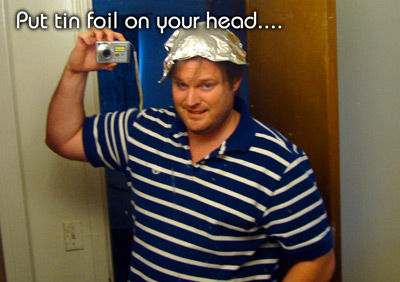
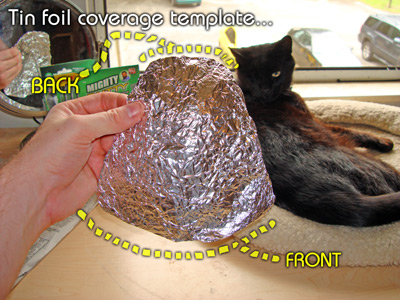
2) Time to make a tinfoil mold of the areas you want to treat with lasers!
Yep, more tin foil! lol... I love the stuff! Ok, what you need to do is do a spot check of your head and think of what area YOU want to cover with lasers! Whether it's just the temples, just the crown, whatever... go ahead and think of that.
I really want to cover pretty much a large part of the top of my head, meaning the temples, the area between the temples, the future "horseshoe" area, and the crown. Now, I don't have much thinning at ALL on my crown, but what I personally want to do is cover the areas that in the FUTURE -like 10 or more years out- would be subject to thinning. I'm thinking ahead! What you do is completely up to you!
Ok, put tin foil on your head again...
And start bending up the edges to completely cover the area you want to:
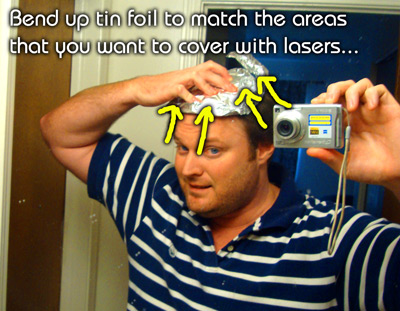
Yeah, I know. This step is harder than you think. Well, the good thing about tin foil is that you can bend, re-bend, and add more if necessary!
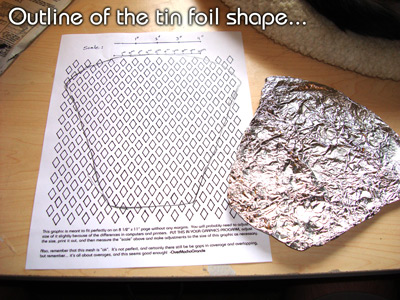
So, finally you are left with a template of the bald areas that you want to treat:
Like I said, yours may look COMPLETELY DIFFERENT, and yes... I want to cover a big area.
So, this is what my shape looks like...
...And we are done with this step!
3) Time to determine how many diodes you need!
Put the shape on the Gutter Guard printout (and cut out and tape together sheets if necessary)...
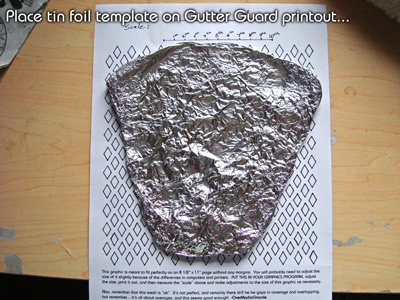
...and trace the shape on the gutter guard, preferably with a pencil (so you won't be confused in the part coming up):
Ok, so you are left with this now:
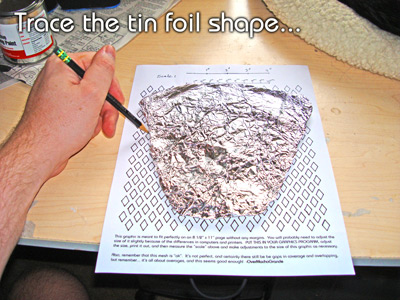
Now is when you grab a marker, and you weave through the mesh, choosing which holes to keep and which holes not to keep...
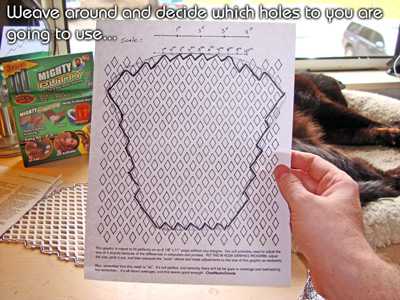
Yeah, don't worry... it's ok to screw up or change your mind on which mesh holes that can go either way should be included or not! Just print out another copy and try it again!
HINT: Try to get this even. One way to do this that I didn't illustrate is to only trace and use the marker to select the mesh holes you want to keep on HALF of the tin foil shape, and then just duplicate the other side exactly!
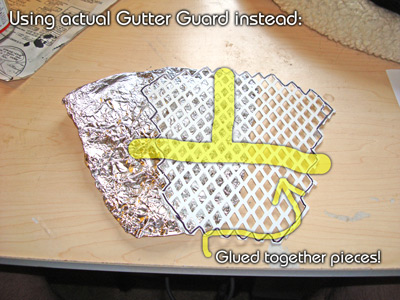
Ok, if you didn't use the print out and have actual Gutter Guard instead, cut out and super glue some sections together, and do the same thing...
Now what?? COUNT! Count the number of holes!
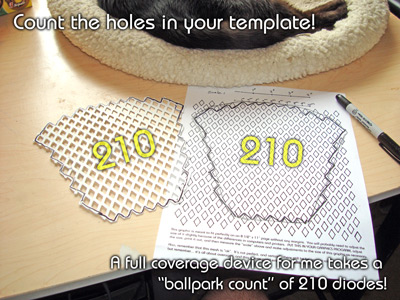
A full coverage device for me takes a "ballpark count" of 210 diodes! Now, if you don't have your helmet yet, you have a number to work with.
NOTE: Like I said, this is a "ballpark". I actually ended up with a count of 217 after I finished the helmet, but I went ahead and got 210. I had an extra diode laying around, so I'm short 6 diodes. At the time I'm writing this, I haven't even placed the order yet!
SECTION 2: Determining the Final Number (after you've made your helmet)...
This section is pretty easy and self explanatory. All you do is figure out where you need to put the diodes now!
Now, you *could* put the tin foil over the top of the helmet like this...
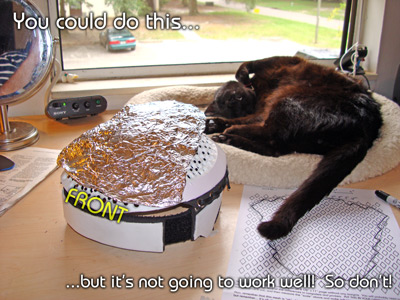
...but that's not going to be accurate! That's because you are putting the tin foil ON TOP OF THE HELMET, which is a much larger surface area than the top of the scalp where you placed it originally. You want that coverage shape to be on the SCALP, not on top of the helmet! That makes a BIG DIFFERENCE on a curved surface!
So, just GUESS. Just take the "ballpark count" number, and see how well you can fill up the diode holes in a shape that will mimic your coverage area, taking into consideration that since it's a curved surface, you need a bigger area on top of the helmet!
Yes, you will have to make some little marks, maybe even use some temporary electrical tape, or -if you are savvy- take a picture and use a photoshop type program like I did to determine the final count (but you don't NEED to do that).
Plus, you will play with the design a little. Remember, that original tin foil shape ISN'T set in stone!
Anyway, just so you can see, I counted and recounted and came up with a good coverage area based on the holes in my helmet, the original "ballpark count", and the shape of the coverage area I need, and these are the holes I'm going to fill up...
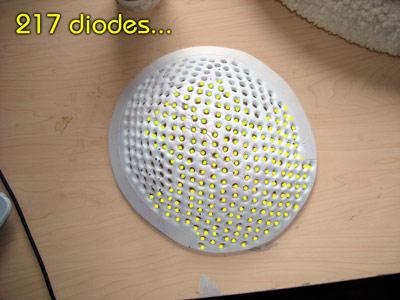
...and the final count that works best for me and my coverage needs is actually 217! If you did a good job in the helmet making process when you put the diode holes in the top, you should be able to get it pretty close.
Now... looking at my shape, you can see that I've exaggerated the sides a little, and it looks like there is a reason for it! In fact, it looks like I've "squared up the area" a little bit. Well, do you want to know why? I'll tell you why in my SECRET SECTION 3!!!
SECRET SECTION 3: Making "Zones" that have at least 68 diodes...
Ok, I'm not going to explain a lot about this here, but I promise I will explain this on a blog on my site as well as the next set of instructions, "Wiring of the Diodes". You are going to have to once again trust OverMachoGrande on this! If you've been halfway paying attention in the forums, you already know what I'm talking about here.
In a nutshell, a couple of us have found that we may be getting EXTRA BENEFITS having to do with "scalp soreness". We have found that if you 1) divide up your treatment session into "sections" or "zones" (doing one section at a time vs. all together), and 2) if you have a LARGE ENOUGH cluster of diodes (very important) in each zone, then it just might be giving an extra benefit that even clinical laser devices don't give. Yes, it seems you may be getting some sort of "scalp exercising" benefit along with the laser therapy benefit.
Why does it make a difference? I don't really know "why" -although I've got some pretty solid theories- but I know it DOES, and it's a difference you can feel. Again, I'll go into that at a later time!
At the time I'm writing this, I haven't fully tested this hypothesis, but I will as soon as I get my "Laser Messiah" up and running. Like I said, I'll explain more later, but take this into account... the couple of us doing this reported faster results than others. Take this ALSO into account, I -OverMachoGrande- will be doing this!
I *will* explain what I'm going to do, though, and I think YOU should do it, too, if your diode count is somewhere in the ballpark of three zones of 68 (204 total.). I wouldn't worry about doing this if your total diode count is less than 150, because I don't know if less than 50 diodes in a section will have the same effect since it apparently takes a certain amount of diodes to get this effect.
Ok, back to my plan of action, since I wanted this helmet to be able to have these alleged added benefits, I want to be able to make this helmet have "switchable zones", each zone being at least 68 diodes (the amount that we were using before that gave us this phenomenon). People that use less than our 68 didn't report this, so that's why we wanted to at least have this much. Plus, we will have the amazing option now of either doing it either one zone at a time or ALL TOGETHER for full coverage!
Since I new I wanted each zone to have at least 68 diodes in three zones, I looked at the design and grouped it off into sections:
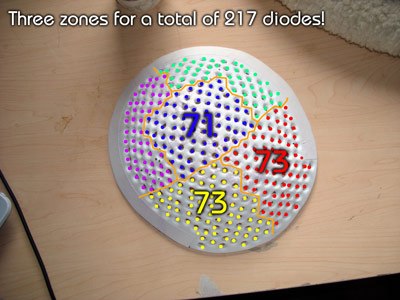
So... I'll be set now when I independently wire these three switch-on-and-offable sections, and I'll be sure to have the most amazing device possible. Now you know why my cluster looks the way it does!
...AND YES, I'm going to show *YOU* how to wire it that way in the next (and final) set of instructions!
-O.M.G.
EMAIL OMG NOW!

Build the device that completely changed the marketplace for laser therapy for hair loss!!!
.jpg "The World's Greatest Laser Helmet for Hair Loss")
.jpg)
.jpg "EMFs and Laser Helmets")
.jpg "Lasers vs. LEDs -there is no competition!")
.jpg "Calendar of Laser Therapy Usage")
.jpg "Additional Common Coverage Patterns of the Laser Messiah II")
.jpg "PulseDrive Introduction Video")
.jpg "Common diode patterns for the Laser Messiah II")
.jpg "The Laser Messiah II works WORLDWIDE!")
.jpg "The laser helmet for hair loss that changed the world")
.jpg "Fitting Instructions for the Laser Messiah Video Screenshot")
Comments (0)
Login | Register