Build the “Laser Messiah I” with O.M.G. -a design so easy ANYONE can make it!!! [Steps 1-3]
This is the first part of the WORLD RENOWN do-it-yourself instructions for the "Laser Messiah I"! This is a full-coverage PROFESSIONAL STRENGTH laser helmet / LLLT Device --and I teach you how to build it yourself!!!
This is the first part of the WORLD RENOWN do-it-yourself instructions for the "Laser Messiah I"! This is a full-coverage PROFESSIONAL STRENGTH laser helmet / LLLT Device --and I teach you how to build it yourself!!!
You wanted a helmet design that's fully functional, but ridiculously easy to make and doesn't take a lot of tools, huh? Well, this is it...
Supplies Needed for the "Build your laser helmet with OverMachoGrande" project...
These are the supplies that you'll need to construct everything for the laser helmet (without the wiring and diodes).
Also, obviously you can find some of these supplies in lots of different stores (and in countries other than the USA... you're going to have to!), but these are the best bets when you are stateside:
From Joann Fabric and Craft Stores:
'Foamies" foam sheets (anywhere from 80 cents to a little over a buck a sheet... sometimes you can find the bigger 12"x18" sheets, but you can just use the smaller ones and glue them together like I did if they don't have your color):
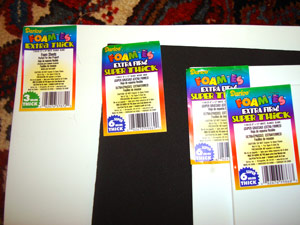
Color A (White, in my case):
• 1 sheet of 3mm (used in bottom part for outermost layer)
• At least 2 sheets of 6mm (unless you can find the 12" x 18" size, and then you probably only need one. This is used for top diode holder, and will be glued together and cut to form a contoured shape)
Color B (Black on my helmet):
• 4 sheets of 6mm (one used for inside padding in bottom part, and three used for the inside rim padding of the top part [you could probably cut it more efficiently and only use one or two for that, but it's so cheap that I didn't care])
• 2 sheets of 3mm (used for for taller layer of bottom and the lip of the top, and will hold the eyelets for connection the top to the bottom)
From Michael's:
• Tandy Maxi Punch Leather Hole Punch Set (About $10. This is for punching holes for our diodes, and at the time I write this, the 17/64 size seems like the best. You *can* us a spade drill bit and a power drill, but I don't think it's as precise and you can tear the foam easier. This is actually a great find to make the diode holes for many reasons I won't mention here!)
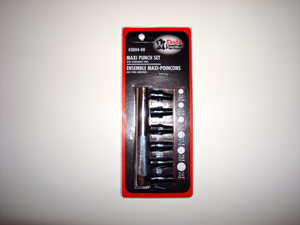
Obvioulsy, this is the size necessary to fit the diodes I use -the AiXiZ 5mm/650 nm ones I have on my site. If you get another brand, you'll have to see what their dimensions are and experiment a bit!
From Walmart:
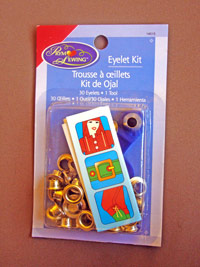
• TWO "Eyelet Kits" (Somewhere around $2 or $3 dollars at the most for each. You need two because one pack only has enough for 15 pairs of eyelets... WITHOUT MISTAKES! lol... You'll make some mistakes and might want more than that anyway. It's found in the sewing section, and it has everything you need to make the eyelets)
• 2" x 4' or 5' Velcro Strips ($6.98 or something. This was actually right next to the eyelet kit in the sewing section!)

• Thick hiking shoe laces (at the time I'm writing this, I haven't gotten this far or purchased any yet so I can't be specific except you want it to be thick, but thin enough to fit through the eyelet holes).
• Super Glue Gel (this is for gluing the foam diode holder together, and it needs to be Gel because you have to hold it in a way that makes regular liquid super glue prone to run! Oh, don't get the slow-dying type... just get the regular gel)
• TWO Paddle Brushes (we are using this for the plastic bristles only! Just get the cheapest paddle brush with regular, plastic bristles that are normal sized (about 2cm), and it'll be about $4. If you are intersted, I bought the Goody "So Gelous" model)

Other supplies you will need:
• Electric Tape the same color as BOTH color A and color B (not necessary to have both, but the top will probably look better if you do. I think both Home Depot and Walmart have a variety of colors, but I'm not sure about Walmart's selection)
• Box cutter or exacto knife
• Scissors
• Hammer
• Glue (like "Goop")
• Tin Foil
• A thin nail about the thickness of the brush bristles (if you use one THINNER than the bristles, it may be slightly more secure but it's a pain in the ass to push hundreds of bristles in through that small of a hole. If you use one slightly THICKER than the bristles, it's much easier to push the bristles in, but it's going to be slightly less secure. It's up to you, and you may want to test one of each. I ended up using one slightly THICKER)
• Optional, but "Gutter Guard" from Home Depot (we are only going to use this for diode spacing. You can print out the gutter guard sheet on my site if you want to use that instead. I mention "Gutter Guard" in a million places on my site, so I won't mention it more about it here. In the store it's only about 80 cents to a dollar or something)
That's all to make everything on the helmet at this point (minus the wiring). Notice the lack of tools you need! ANYONE can make this!
If I find I need something else along the way over the next few days (or if I find that I've left something out), I'll add it to this thread!
-O.M.G.
This is what you've been waiting for... such a simple, basic, but cool looking laser helmet to make and you don't even need any power tools! You don't even need a SAW! Please remember, though... although it's so simple a five year old could make it (or a drunk college student in his dorm room) this helmet is well thought out and addressess specific problems some of us have had making them, so trust me... there are REASONS I've made it the way I did!
"Part 1" Table of Contents:
• Preamble: Why I'm not actually using a "helmet" for my 2.0!
• Step 1 - Manufacturing the Base... a soft, padded, velcro-tightenable "helmet".
• Step 2 - Making your tin foil "head mold"!
• Step 3 - The initial formation of the top part of the helmet!
July 28th, 2007 - Preamble: Why I'm not actually using a "helmet" for my 2.0!
Lemming and I have something in common... we both were pretty lucky in finding helmets for our needs! Finding a good helmet is actually a lot trickier than you might think.
For my Golden Boy -my first laser helmet- I needed a helmet that had a large flat side to build the "support structure" that would enable me to suspend my cluster rigidly in place as well as enable me to move it however I wanted to cover whatever part of my scalp I needed it to. I found a Tony Hawk skaters helmet that fit my needs pretty well. I had to buy it extra tight because I new that I was going to cut the top off the helmet, so all of the support would be on the sides. Basically, I have only an inch or so of helmet left on the front, and it diagonally climbs to a couple or three inches on the back. The extra padding this helmet had keeps it from sliding down.
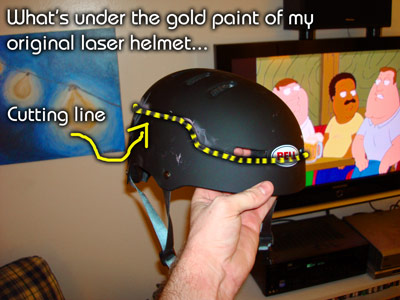
So, I basically turned a thirty-something dollar helmet into nothing more than a rigid headband! Like I said, I needed that for my first plan.
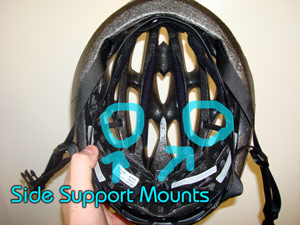 Lemming was lucky because he found a bicycle helmet with an "adjustable headband" built in that had very low "mounts" -meaning the three or so spots that attached the headband to the helmet were low enough that he could cut a large enough section of the top off (and therefore exposing the necessary area of the scalp so you can treat it with lasers) without cutting the mounts. This picture obviously has the side support mounts I'm referring to.
I love the idea of having an adjustable headband. HOWEVER... for the life of me, I can't find a helmet like his or that has low mounts. Here is an analysis of two helmets that are typical out there.
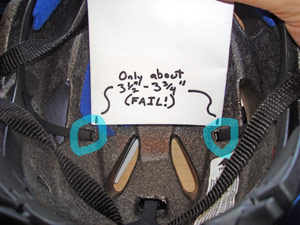 This first one is a Bell Adrenaline, and actually was the very first helmet I ever got -even before the Tony Hawk helmet. Once I got it home, even though it was damn comfortable and had a snug headband, I realized that cutting the necessary amount of top off of the helmet would cut away the support mounts from the headband. Actually, the distance between the two side mounts is only between 3 1/2" and 3 1/4", and that is nowhere near what my ginormous head requires. Basically, I put this helmet in the closet and I have it if, well... I ever decide to start biking! lol...
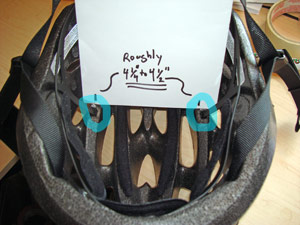
This second one I just bought recently. It has a greater area in between the mounts at almost 4 1/2", and I assumed this was the answer! But after I cut it -leaving the side mounts intact- I realized that NOPE... it was nowhere close to the size I needed! Another $29 down the drain!
 I've looked at pretty much all of the major places to find helmets, and I can't find them like Lemmings, and no matter the brand, they all seem to have these extremely high side mounts! Oh, and I should mention that the type of smooth, black plastic the mounts are made of is un-glueable. Mighty Putty won't even work on it! Therefore, you cant just cut the mounts and glue it on a little lower. Plus, since it's on the inside of the helmet, you can't really bolt it on or anything like that because the head of the screw or bolt would be potentially sticking in your head.
Therefore, I'm ruling out bicycle helmets.
So, I do have the option of spending another 30-something dollars on another Tony Hawk skaters helmet. Well, I couldn't find the one like I used before, but I only checked one spot. The greater point is this...
I don't NEED to have this Tony Hawk skaters helmet if I'm not going to have a side structure. This device is going to be a "full coverage device", so I don't need to be able to move the cluster around. Plus, it's going to rest on foam and brush bristles. So why spend almost $40 on a helmet that I'm essentially cutting down to the size of a headband??
So there you go! I'm not going to use an actual helmet. Why does this matter, and why am I bothering to write this post?
Because if the solution I have thought up actually WORKS (and I'm not 100% sure it will yet, but hey... we're all pretty resourceful and I bet we can make it work just fine)... it's going to be REALLY EASY AND CHEAP TO MAKE.
When you see the steps laid out, you'll realize that "Oh my god, I can totally make this". And without many tools at all. In fact, you might not even need a drill.
So, I'm hoping that this design ends up to be the "theoretically easiest design" that I've been fantasizing about for a long time! I think this design will take out a tremendous part of the "intimidation factor" involved in these, and I really do think it'll give hope to even the most "tool retarded" of us!
I know you can't see into my head so you don't know what the design looks like, but you can comically imagine a yamika full of diodes attached to a headband for support for the time being, except it should actually be quite decent looking and be fairly strong...and COMPLETELY FUNCTIONAL! lol... That'll do for now, and I PROMISE that when you actually see it in action, you won't think of it that way at all! You'll dig it! And at the end of step one, I think you'll start getting a better picture!
Oh, if you have a helmet that you've found that seems to meet the criteria that I've laid out, by all means... use it! Helmets *are* indeed nice!
Back to the point, this is what I and a few others are going to do... we are going to do this together, and not everyone even has their diodes yet to put in! INCLUDING ME! We are just going to build the shell -the hardest part because wiring is simple- and have it ready for when the time comes. Like I said, it'll be cheap and it will use supplies you find in Wal-Mart and a craft store... so I hope more people take part in this project! If you are still waiting to take the plunge, it wouldn't hurt to have the shell waiting for you!
O.M.G.
PS - Step 1 will be making the headband part. I'll put it together tomorrow, make sure it works (and that I didn't just waste my time here writing all of this), and tell you how to do it!
July 29th, 2008 - Step 1 - Manufacturing the Base... a soft, padded, velcro-tightenable "helmet".
There are two parts of this helmet... the base and the top, and this is for lightweight but sturdy base! It will be a soft, padded, velcro-tightenable "helmet" that custom fits your head perfectly. Also, this WILL BE THE ACTUAL HELMET I will use for my 2.0! Let me say something... it'll take you longer to read this than it will to make it. It's SIMPLE, and takes virtually zero tools or skill.
Remember, this is for the manufacturing of the theoretically easiest helmet imaginable that does allow for OverMachoGrande's minimum requirements of:
-contouring to the scalp,
-uniform spacing above the scalp,
-full coverage,
-COMFORTABLE
-secure and sturdy on your head.
-And it's CHEAP AS DIRT.
This design takes the most minimal amounts of both tools and skills possible, and it still should look pretty decent. I'm not going to cover other ideas in this post, but I may get to other ones (like the construction helmet idea) later on!
When I mean "minimal tools and skills", I mean just that... you don't even need a saw or a drill. And one more thing... trust me! Trust me that I made sure that this design is not only PURPOSEFUL and well thought out, it's going to be pretty cool! OK! Let's roll....
I'm going to list only the things that you need for this step, but at the bottom I'll tell you other things that you can pick up from the same stores so you only have to make one trip!
This step requires:
1)2" wide velcro strips with adhesive backing. You need them to be long enough to wrap around your head, and the 4' package I got is plenty. You can get this at Wal-Mart for $6.96 or something (and actually I found this in the sewing section right next to the "Eyelet Kit" that you need, so see below).
2) Foam! You get these sheets from craft stores (JoAnn and Michael's both have them, although I liked JoAnn's selection a little better), and they are called "Foamies". They sell it in a variety of thicknesses and colors, as well as a couple of different sizes. They are VERY CHEAP... like a $1.50 a sheet maximum. Get the biggest sizes they have in the color you want, but more than likely you'll have to glue a couple of sheets together. You can make it in whatever colors you want, but I chose white and black for illustrative purposes, the fact that white will be used for the diode cluster and it's more reflective, and that yes... it'll look like a Stormtrooper's helmet a little when we are done (especially the speeder bike ones).
The thicknesses are pretty important because we will have to make padding with them at a much later step that has to be a certain height, but just mimic what I bought in terms of thickness. Cat's like to lay on the foam, by the way.
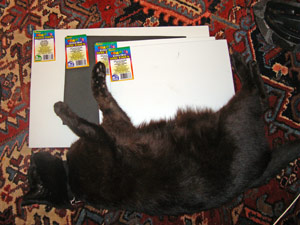
For this step, I used one 6mm black 9" x 12", one 3mm black 9" x 12", and one 3mm white 12" x 18" (they had a bigger size here so I got it).
3) Misc: Glue (I used "Goop"), a box cutter/exacto knife, a straight edge so you can cut a straight line with it, scissors, and some tape (I used electric tape).
METHOD:
This method requires cutting foam strips, which you use a box cutter/exacto knife and a straight edge on a hard surface that you don't mind scratching up...
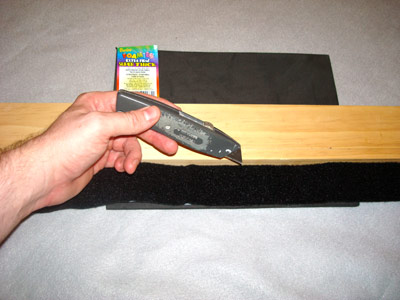
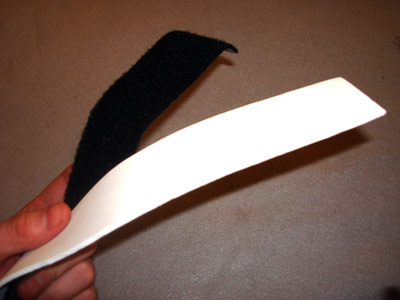
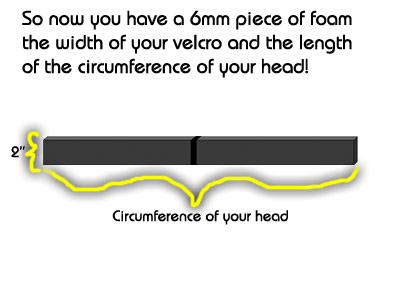
1) Cut the 6mm black strip as wide as the velcro (2")...
...and cut enough strips so that it will fit all the way around your head (two should do it... and slightly less is ok), and then glue those strips together, and you can cover the seam with tape (I used electric tape because it's pretty flexible) to make the seam stronger...
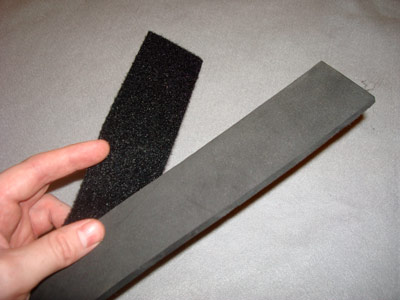
By the way, it's the camera flash that's making the black 6mm foam look grey... don't worry, I still only have two colors! This strip will be the inner liner that goes up against your head.
2) Cut the 3mm white as wide as the velcro (2")...
...and once again, cut two so that it will stretch all the way around your head and glue/tape them together...
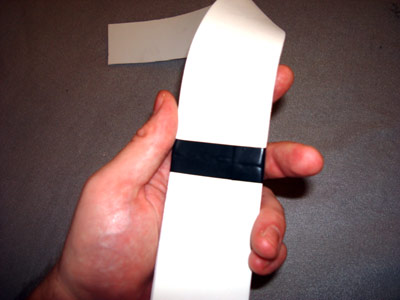
Yeah, the black tape on white might potentially bug me later, but I can fix that with white electric tape if I really feel the need! lol... This layer is going to be the outside layer of the bottom (and is frankly functionally unnecessary, but it'll make it look a lot better, and looks are somewhat important to your happiness with it).
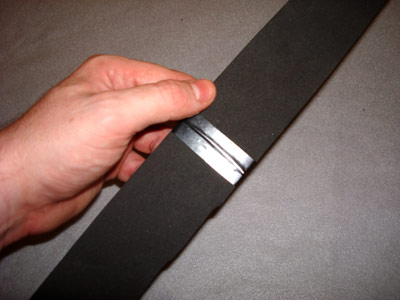
3) Cut the 3mm BLACK strip to be 1/2" wider than the velcro...

...and you guessed it, glue and tape:
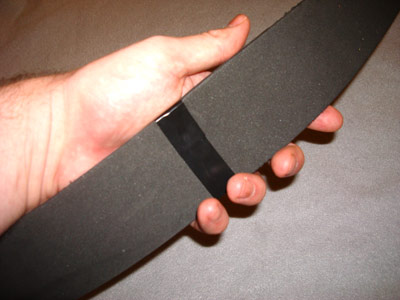
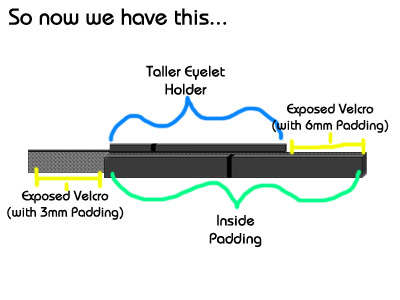
The reason that this layer is wider is because it is going to hold grommets for fastening the top and bottom together.
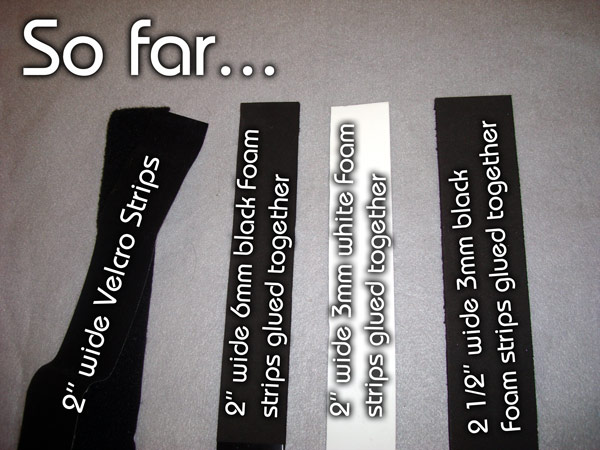
So... this is a good time to show what we have so far:
4) Now comes the assembly time. Due to the fact that I've been informed that this part is a little hard to follow because it's hard to see which foam pieces I'm talking about -and I want to go out of my way to show that this step is simply three pieces of foam glued to two pieces of velcro- I'm going to add graphics interlaced with the pictures to help people visualize the simplicity of this!
If you are just reading through this and you think it's confusing... STOP THINKING! lol... Just make it, and you will see that it's not confusing at all!
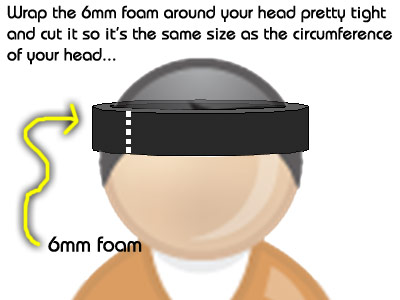
Wrap the 6mm black foam strip that you assembled TIGHTLY around your head and trim is so it's there is no overlapping, and maybe even slightly smaller. Basically, you are making it so that this strip is now the same circumference as your head (or slightly smaller).
5) Peel of the adhesive backing of one of the velcro strips and press it to the 6mm black for strip...
I used a little bit of glue because I don't know how strong that adhesive actually is, even though it's supposed to be "industrial strength"!
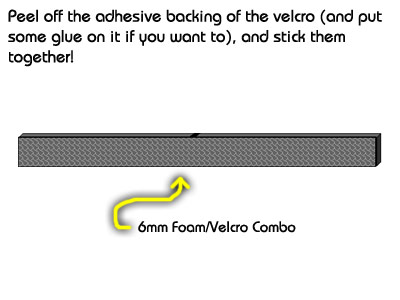
When you are through, you are left with...
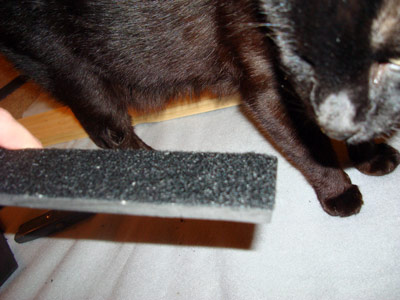
...one solid piece. This piece passed inspection from my cat!
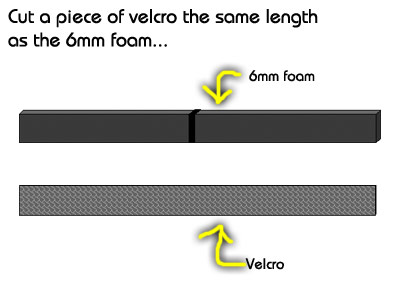
6) Cut the other side of the velcro to the same length...
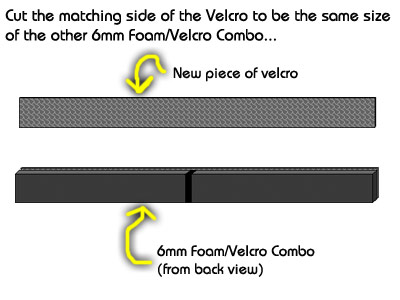
...so now you have two pieces of velcro the same length, and one is glued to the 6mm black.
7) Next, you are going to put the pieces together, BUT... ...you are going to offset the newly cut velcro approximately the WIDTH OF YOUR FORHEAD. TRUST ME... you'll see why soon:
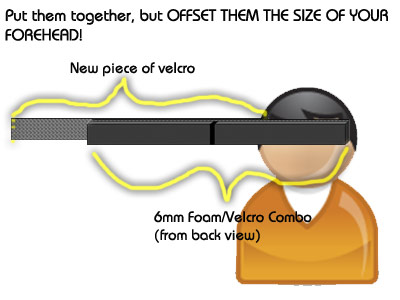
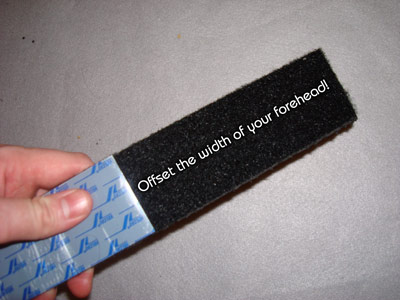
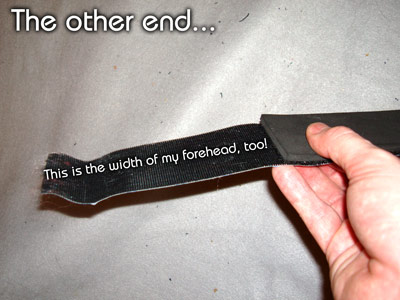
So yeah, just hold up the velcro to your head, get the approximate distance from when the sides of your hair ends to where the other side of that hair begins, and offset it that amount.
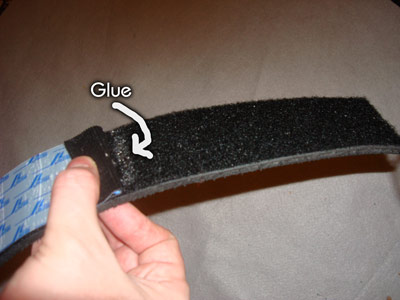
8) This is pretty optional... I put a dab of glue on the ends of the velcro (is gluing velcro even legal??) just because the velcro that's joined together isn't ever supposed to come apart again... only the offset edges are!
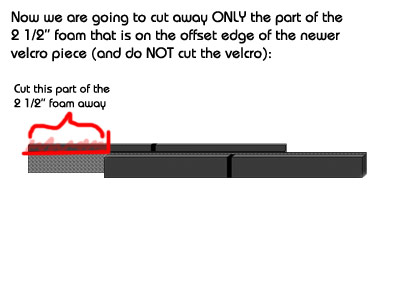
9) Now is the time for the 2 1/2" 3mm black layer -the WIDER piece!
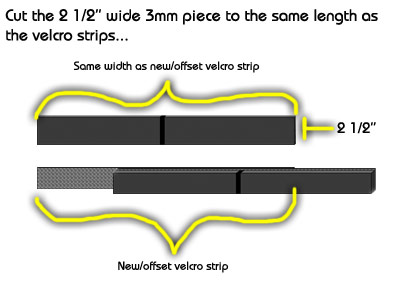
You are going to tear off the back of the sticky velcro and press on (extra glue may or may not be necessary) that wider piece over the entire sticky velcro back. This is important, you will MAKE THE BOTTOM FLUSH! The wider 1/2" material is going to be sticking out on the top....
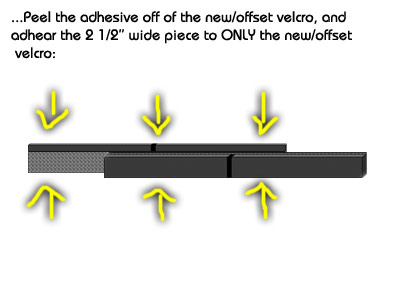
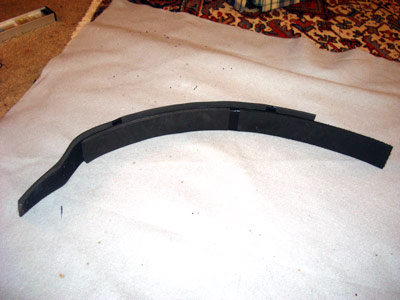
...And trim the ends to make it nice and neat. So basically, what you've done is add the wider foam piece ONLY to the newer velcro layer.
Oh, and yes, the bottom side is all flush! The graphics I show are done from a 3-D angle that is supposed to show width and depth a little better, and I realize it occasionaly looks like the bottom is offset or something. It's NOT... all of the layers are flush on the bottom!
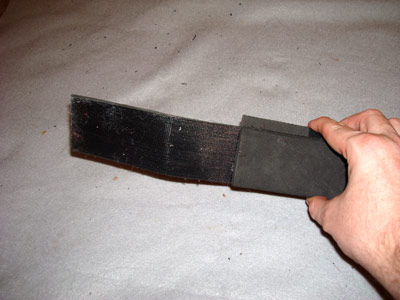
10) Ok, trim the end on the offset side to be the same size of the velcro strap...
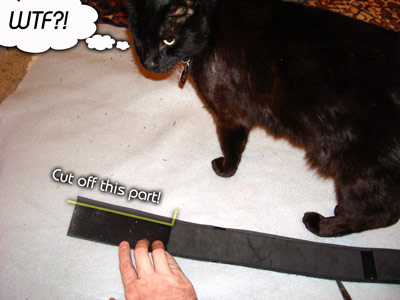
...so it looks like this:
11) Now is the time for the white strip! You are going to glue the white strip on the outside (covering all of the outside foam you just put on a second ago), FLUSH with the bottom. Obviously, this is going to take a lot more gluing that the others, so I'd glue the back of the white and then CAREFULLY put it on and trim the ends to make it look pretty...
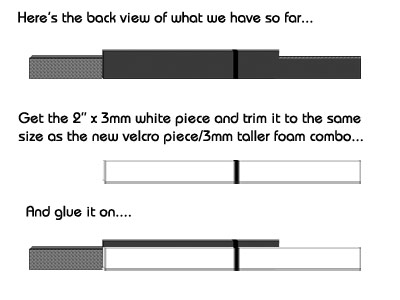
Like I said before, this step really isn't necessary, but it'll make it look MUCH better and adds some necessary strength to it. Also, make sure this layer dries thoroughly before you move on!
12) Ok, well it's already functional as it is for a base, but I want it to fit a little more "down" on my head to make sure it's not too tall to end up with the top part... but my ears get in the way! And also, when you pull it down it's so close to your eyes you look like the singer of "Suicidal Tendencies"! lol...
So, let's fix the problem. Put it on your head for the first time and line up the helmet so the taller foam is "centered" in the sides and back. Then, push it down so it give you Barack Obama ears (Obam-ears), use something to mark where your ears are, and then cut ear slots! Then, put it back on and mark your forehead so you can cut the part that covers it so it's out of your eyes.
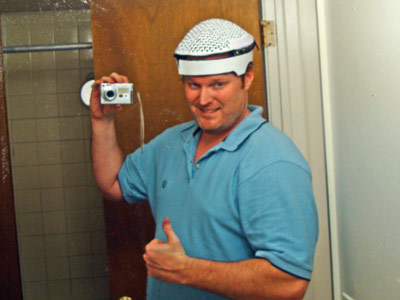
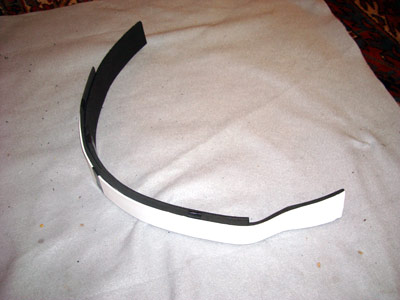
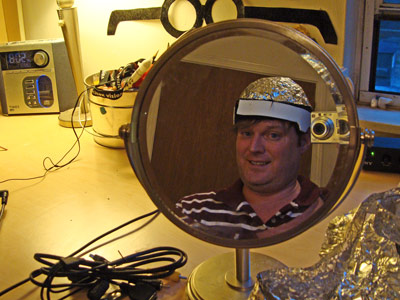
Here is the final deal, and yes... this is me after a long day without a shower:

So yes, it's padded, it's comfortable as hell, you can get it as tight as a mo-fu because it's velcroable! ...And it will attach to the top part that we will make soon!
Oh, and yeah, the black area on the velcro front is simply because I made it a little too short... if I did it perfectly, the white would extend all the way to the other white. ...But I'm not going to worry about it! lol...
I'm going to post tomorrow a summary of what supplies you need to get from each store so you won't have to make multiple trips when we get to other steps!
-O.M.G.
July 31st, 2008: Step 2 - Making your tin foil "head mold"!
Without a doubt my favorite pictures for ANY project I've ever done! lol...
This is the preliminary step for making the top part of our laser helmet! I can't take credit for this step at all... I simply put two great ideas together from Lemming and thSman!
Lemmings idea was to make a "forming bowl" out of tin foil that matched the shape of your head and then glue together rubber brush bristle pieces inside of it. ThSman's idea -based on cutting apart a swimmer's cap- basically was to make a helmet out of an acrylic material, and it only had one seam (see "ThSman's Laser Helmet! You've gotta see this..." for more details).
My idea is to use the tin foil forming bowl actually as a "head mold" and cut it similar to how thSman cut the swim cap and molded the acrylic! However, we can't make the entire helmet like thSman because we want the addition of brush bristles to give our undiffused diodes some room to spread. That means we need two separate pieces -the top and the base- and it also means that we are going to have to make the "head mold" slightly larger than our head to allow for the brush bristles!
In this step, all we are going to do is make the slightly-bigger-than-our-head "head mold", and cut it! It's a very easy day today! lol...
Let's roll...
1) We need to make our head BIGGER. It doesn't have to be two centimeters bigger (the length of the brush bristles) because we'll have some built in extra room, but it does have to be a little bit bigger.
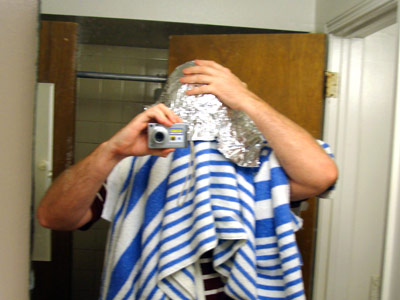
The best way to do this would be to put on two or three knit caps (without the ornamental fuzzy ball on top, of course! lol...). Well, I don't live in an area that has weather conducive to owning ONE knit cap, much less two or three, and I'm not "gangsta" or "emo" so it's not a part of my wardrobe.... but we do take baths here. So, I'm going to put three towels over my head.
So step one is simply to...
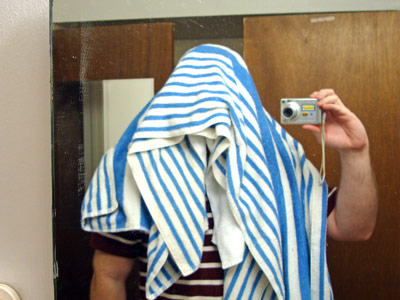
...put towels or knit caps over your head!
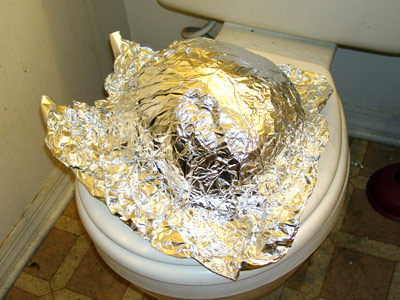
2) This is where we start with the tin foil! I actually use the larger, extra strength tin foil, but I think the smaller, regular tin foil will work just as well.
Take a sheet of tin foil and crunch it over your head!

3) Now, even though you *think* you might be able to get away with one layer here, it's so much better to work with multiple layers of tin foil glued together. You'll see when you do it... after every single layer, it because a much different feeling thing and it holds it's shape much better. So, step three is to glue another layer on.
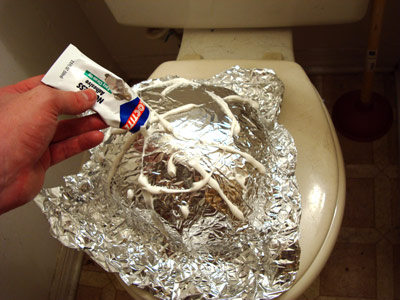
What I did first is that while I still had the towels on my head, I bent up the edges so it basically fits me like an Indiana Jones hat would...
...and then I took it off so I could put glue on it. Yes, my bathroom floor is absolutely disgusting! Get over it! lol...
And you can see that it really doesn't have that "head-like" shape really, so more layers are definitely necessary. Ok, so why did I make it like a hat?? Because it's easy to see where you need to glue it that way! Plus, we're going to end up cutting it at about that point anyway.
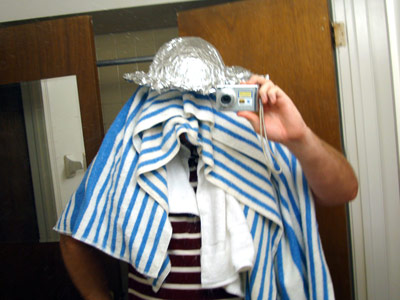
Make sure when you take it off, you remember which side is the front! Then...
...just glue it wherever. The more the better, but you certainly don't have to cover every square inch!
Now, crunch a second layer of tin foil down on your head...
Isn't this fun!
4) Repeat the gluing and crunching steps until you are least have five layers. You can see the definite shape of your head coming out with each layer. And yes... your head is very misshapen and ugly and everybody notices. You can do up to 10 layers if you want, but I stopped at 5 because I'm using that thicker, bigger tin foil, although it probably would have been a little better to do a couple of more.
5) When you do your last layer, really focus on folding the brim to be like a fedora hat...
Then take it off, and you might want to mark the front of it so you can remember:
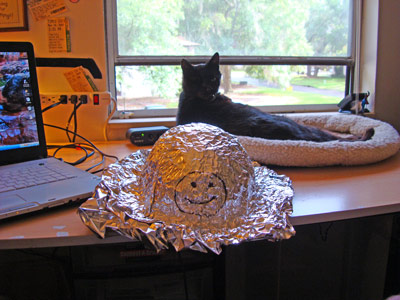
Now... it's BREAK TIME! Chill out and do something else for a while and let the glue dry! We're almost completely finished with this step.
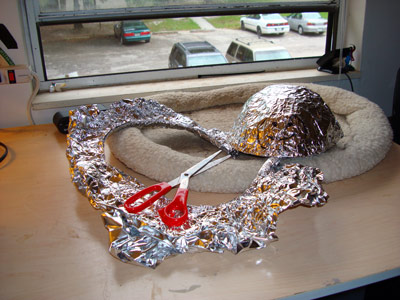
6) Ok, so you've let the glue dry, so it's time to do some rough trimming! That's right, Cut that brim right off...
7) Now that we've done the rough trimming, we need to do the fine trimming! Put the base that you constructed on your head to where it would normally fit comfortably. Remember, we had the towels on our head before to allow for the spacing of the bristles. Well, since we need to see what we are doing this time, we can't use towels again so we need to stick something on the top of our heads to act as a spacer.
I found that the roll of electrical tape was about the width of the bristles, so hey, why not...
Put the roll of electric tape on your head, and then...
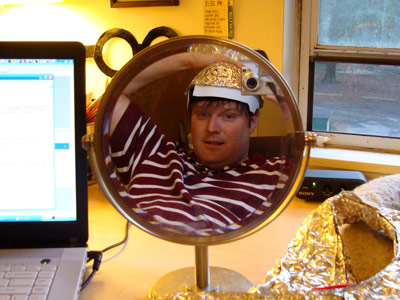
...put the tin foil head mold on your head!
Now you are ready to fold the brim up again all the way around, maybe to just right above the top of the bottom part:
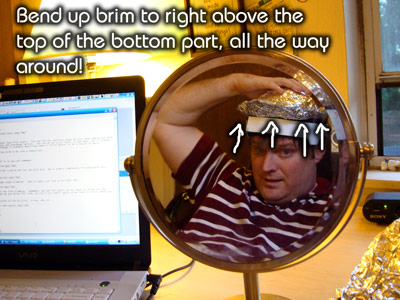
Yes, it'll look like a Huck Finn hat (or a Pet Shop Boy's hat or something), but now you can cut it! So, cut off your Huck Finn brim...
...and you are left with this! Remember, the roll of electric tape is still on my head here. Also, yes, this is slightly bigger than what the final foam product will be. We will have another chance to trim it up in the next section.
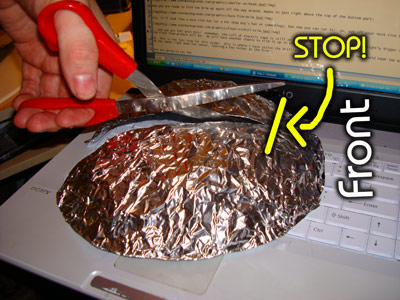
8) This is the last step for this stage! This is where I have stolen the brilliance of thSman. Cut the foil head mold FROM THE BACK TO THE FRONT right down the center, leaving a few inches at the front:
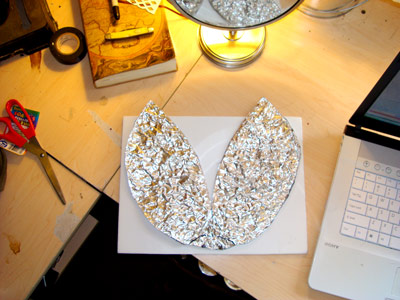
The, you are going to smash it down flat, and you are left with something that looks very much like Bunny Ears!

That's it for this step! Keep that in a safe place, and I'll have "Step Three" ready either tomorrow or the next day!
-O.M.G.
PS- ...And yes, those *are* Brainy's glasses from my smurf video up on the wall! lol...
August 1st, 2008: Step 3 - The initial formation of the top part of the helmet!
In this step we are forming the helmet out of sheets of 6mm thick, white foam, doing the final trimming (if necessary), and adding reinforcement and markers for later steps. Ok, let's jump right into this...
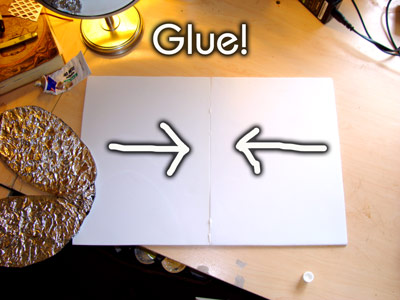
1) You will notice that our "tin foil bunny ears" from the previous step are probably going to be a little bigger than your foam sheet.
So, duh... glue two sheets together!
And then tape the seam (notice that I'm using electrical tape the same color as my foam for aesthetic purposes)...
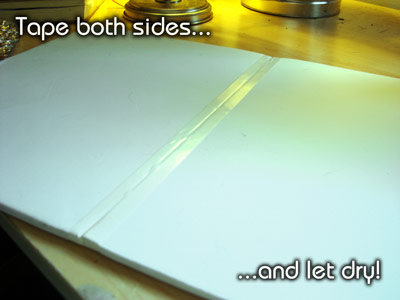
You can use the Super Glue Gel if you want to here. I didn't, but Super Glue works AMAZING with foam.
So let the glue dry for a while, and then we are ready to move on!
2) Trace the "bunny ears"...
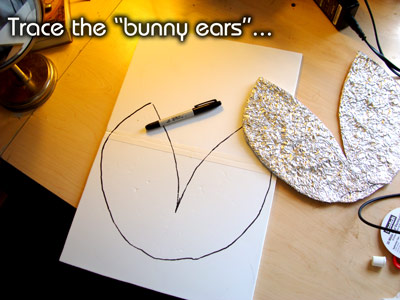
3) Cut out the "bunny ears"...
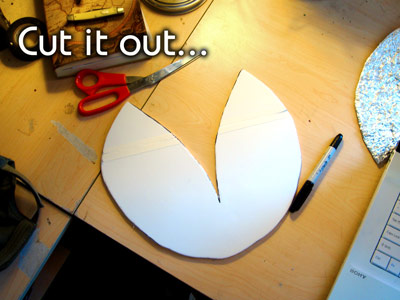
Don't worry about permanent marker being on the edges because those edges will either be taped over or trimmed. You won't be able to see them!
4) Get your Super Glue Gel out! SLOWLY and CAREFULLY -like an inch at a time, start gluing the seam together...
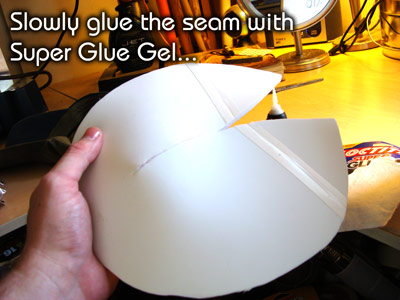
Take your time really pressing the edges together! Here is mine fully glued:
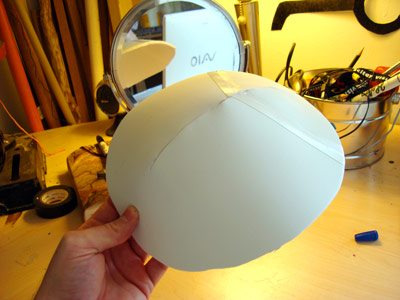
...And DON'T WORRY IF ONE SIDE IS BIGGER OR MORE LOPSIDED THAN THE OTHER! We'll fix that soon enough! lol...
5) Don't like the nasty looking seams and want to minimize the ridge? Me neither! FLIP IT INSIDE OUT!
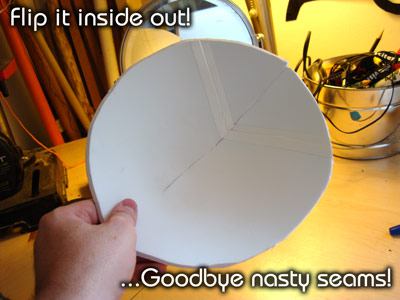
POP! Looks much better and has a much better shape now, huh!
6) Snip the back if necessary, if you have one side that's longer than the other...
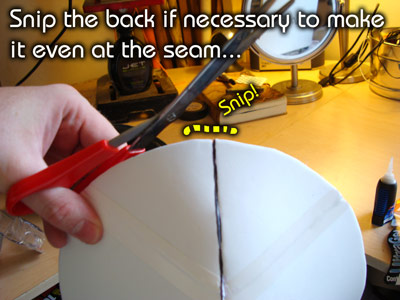
Don't worry about trimming the rest yet! We'll get to that in a second.
7) This step is for reinforcement of the seams! Tape the top of the seam...
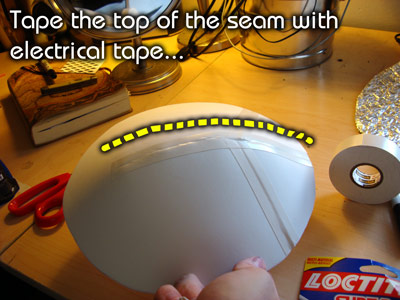
...and the bottom:
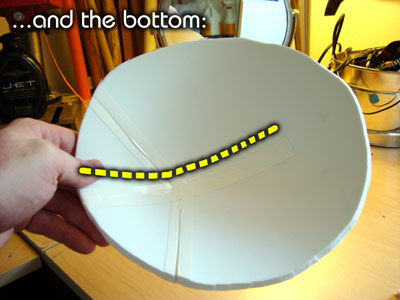
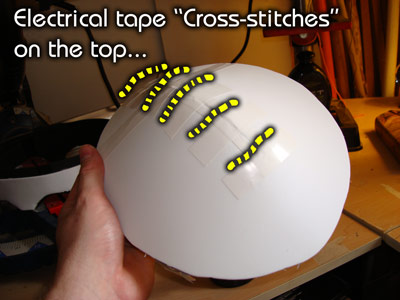
Now you are going to make it look like a football! ...An American Football, by putting cross-stitches of electrical tape on it on both the top:
...And the on bottom:
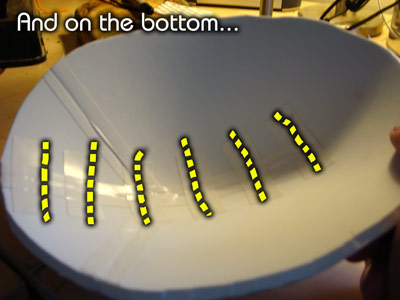
Ok, this is probably enough support for the seam!
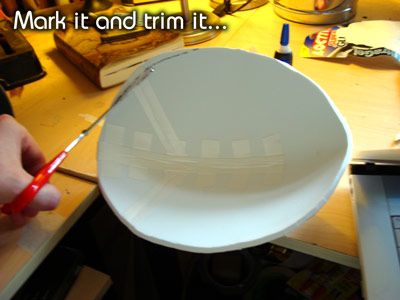
8) Now comes the "trimming and evening the sides" part. Gently bend it together right at the seam (don't completely fold it), and analyze the unevenness:
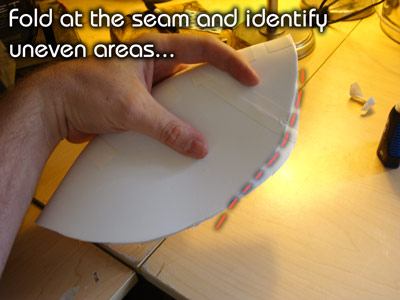
I'm always quite surprised how even it actually is, but anyway.... mark it, and trim it up!
9) This the second-to-the-last bit we are doing today, because "Step 4" is time consuming and tedious -actually marking the diode holes, making the holes, and inserting the brush bristles and supporting foam!
Ok, put on BOTH the bottom of your helmet and the top part of your helmet (and put roll of electric tape under the top part again for spacing), MAKE SURE BOTH OF THEM ARE CENTERED (you can tell by the seams!), and make a mark on the top part on one side right where the taller lip of the bottom part is...

Then, take of the top and fold it together and make a mark on the other side....
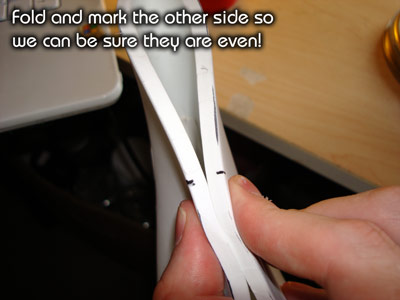
I simply did it this way because I wanted the marks to be even because this step is harder than it looks (and you should try to take a picture of it!)
Oh, I realize the top part at this point looks like a hat that a Chinese farmer of old would wear in the fields, but don't worry... it won't end up looking like that! The edges will not be "bowed out" like that, and the ridge won't be as pronounced! Trust me! lol...
10) Last step for today! Put electrical tape around the edge of the top part from the first mark, around the back, and stopping at the second mark:
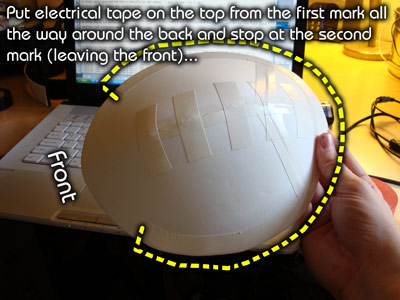
This tape is strictly for spacing! This will tell us where NOT to put diode holes and brush bristles, and where to put the foam support and top "lip" to hold the eyelets that match up with the base!
That's it for now! ...and the next step is a pain in the ass. It's not hard, it's just LONG, and you will be seeing spots by the time you are done!
-O.M.G.
PS- Just for you to see the comparison, here is the original gutter guard thing I glued together to determine how many diodes I needed to cover my thinning areas held up to the "foam dome" I just made (as best as I can... it's hard because the gutter guard isn't flexable)...
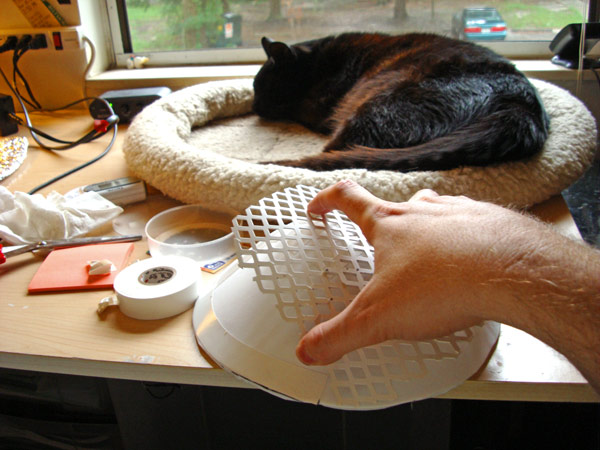
As you can see, not only does it fit the areas I need, it has room for many more diodes than the 210 I need (if I so desire). No... most people aren't even going to need 200, or probably even too many over 100 for that matter, but I'm just saying that this thing will have room enough to make any sort of diode pattern you want!
Click Here for "Part 2!"

These are the instructions that CHANGED THE WORLD of LASER THERAPY --UNDISPUTABLE!!!
.jpg "The World's Greatest Laser Helmet for Hair Loss")
.jpg)
.jpg "EMFs and Laser Helmets")
.jpg "Lasers vs. LEDs -there is no competition!")
.jpg "Calendar of Laser Therapy Usage")
.jpg "Additional Common Coverage Patterns of the Laser Messiah II")
.jpg "PulseDrive Introduction Video")
.jpg "Common diode patterns for the Laser Messiah II")
.jpg "The Laser Messiah II works WORLDWIDE!")
.jpg "The laser helmet for hair loss that changed the world")
.jpg "Fitting Instructions for the Laser Messiah Video Screenshot")
Comments (0)
Login | Register