OverMachoGrande’s First Laser Helmet (The “Golden Boy”!)
I have fond memories of my "Golden Boy"! Obviously, this was nowhere near as effective as my Laser Messiah I or Laser Messiah II -but 68 diodes in a moveable cluster is enough to get your foot in the door! Plus, this thread has some nostalgic value for me, so I'm leaving it in place!
I have fond memories of my "Golden Boy"! Obviously, this was nowhere near as effective as my Laser Messiah I or Laser Messiah II -but 68 diodes in a moveable cluster is enough to get your foot in the door! Plus, this thread has some nostalgic value for me, so I'm leaving it in place!

IXTY-EIGHT, diffused 5mW diodes in a 4" x 3" cluster that is moved three times for complete coverage -and referred to as resembling a "Geriatric Toilet Seat" by Whovian at Regrowth- this...

...is my Golden Laser Helmet! Having built it and seen it in action, I will tell you that this complex design -although functional- is a bit unnecessary. My excuse is that when I built it... I simply didn't know what to expect! This was new territory! I didn't know what was necessary and what wasn't, I didn't know how a huge cluster of diffused diodes would behave, I wanted to be able to move the cluster, etc., etc., etc...
So, I passed on this information to the forums and thankfully the new designs are much more "to the point" now. There are some really cool looking designs that people have made, so make sure you check those out. If you are looking for a "bare bones" way to fabricate an effective design, check out my page called "The [Theoretically] EASIEST Design for a Laser Helmet".
Enough excuses, though... the thing works great. I move the cluster three times (20 minutes in each section), and it gives me roughly 5 joules per centimeter squared. It does have a couple of design flaws that I'll discuss in a second, though. We'll take this in four parts... determining the cluster size, the helmet design, the wiring, and those design flaws. Let me make this one point though before we start: The main benefit of my design is that it has a moveable cluster of diodes, which makes it so you don't have to spend as much money!
Determining the cluster size...
 Like I just said, I wanted to be able to move the cluster three times so I didn't have to spend a tremendous amount of money and figure out to power an insane amount of diodes. This was important to me at the time... I didn't even know if the skills I'd learned from building the brush would be enough! I didn't know if the damn thing would work at all! I decided that it would be best on this Version 1.0 to limit potential losses and make a cluster that would be moved three times for complete coverage. This picture shows how I wanted to divide up those three zones.... basically one section over each temple and one over the crown.
To determine the necessary amount of diodes, I put a piece of tin foil over my head and folded up the corners to match the size of the tin foil to exactly cover the areas I wanted to treat with laser light (basically, all of my MPB-prone areas), with a little bit of room on the sides to ensure complete coverage. Then, I took that tin foil, traced it on paper, and drew marks to show the three equal zones. I go into detail on this in section #6 on the Do-It-Yourself Introduction (Revisited!) and Checklist.
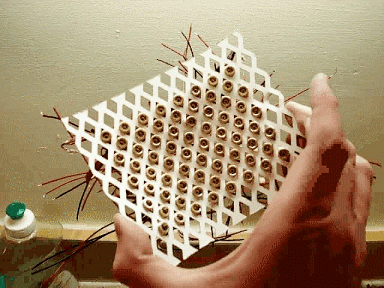
Hopefully you've read other parts of my site, especially the "Do-It-Yourself Introduction", so you already know that I needed mesh to hold the diodes. This is for ease of future repairs and because "diffused diodes" can allow a little space in between them... definitely a cost-saver! So, I marked the size of the zone on the mesh, allowing for a little overlap in order to secure it, and ended up with a roughly 4" x 3" cluster with 68 diodes.
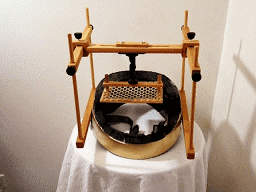
Here is the cluster...
So that is the reasoning behind the size of my cluster and how I went about making it. Now... thinking of how I could easily make something that could hold the cluster in place, move in every conceivable direction, and take into account the curvature of the the scalp was no short order!
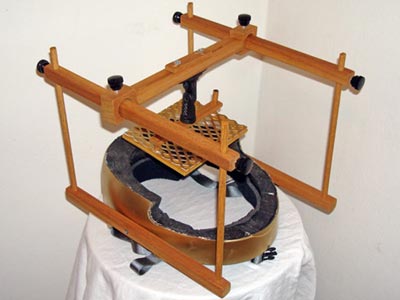
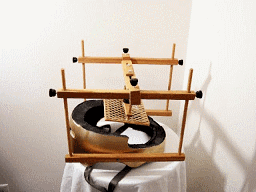
The Helmet Design...
I won't go into the step-by-step details of making the helmet because you can just look at it and see how it's made. ...And yes, this design isn't the easiest one to make! lol... Instead, I'll just walk you through the functions of each part and why they are necessary.
First of all, here are some close-ups of the shell...

A couple of notes about the materials: the helmet was a Bell Tony Hawk skating helmet which I think was $29 at Sports Authority. The gold paint, of course, I had left over from my lightsaber from my "Cigar Lighting" video.
I lucked out on the cedar wood... my parents are building a new house, and when I was home for Thanksgiving I got a bunch of scrap wood. I think it's left over from my mom's closet?? lol... Anyway, it's the perfect wood because it's so light and soft. Any wood would have worked, of course, but this makes it have that classic, vintage look!
The round wood pieces are oak dowel rods that are only a buck or two at Home Depot/ Lowes.
Aside from the helmet (and of course all of the diodes), the most expensive part was that black speaker mount from Radio Shack that does all the swiveling... I think they are up to 15-freaking-dollars now, which is ridiculous. APIECE!
Oh yeah... the other things that were surprisingly pricey were those little black knobs. They were about $2.50 a piece... so yeah, I spent $15 on those damn 6 knobs! I probably could have made some from screws I already had FOR FREE, but oh well... I do like them.
Now, let's look at the functionality. This design allows for a complete range of motion and the ability to lock the cluster into place:
Left and right:
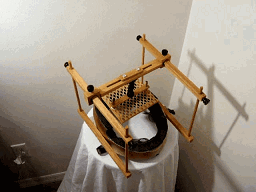
Forward and Backward:
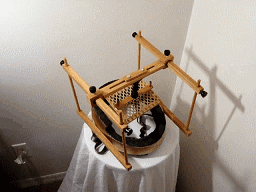
Up and Down: (sorry this is a little clumsy looking)
...And swiveling at all all angles:
So... this is why I designed it like I did! True, it's not a design for mass production, and it does probably take a little bit of woodworking skill, but again... take a look at the other helmet designs and you'll probably be able to figure out something that suits you that is much easier.
The fact is though, the helmet design part was THE HARDEST PART by a long shot. Hopefully you've already read the other sections of the page and you already know that wiring this stuff is SO EASY! We'll talk about that a bit though...
The Wiring...
Wiring... is easy. ...And it's all done the same way, too. I've covered it pretty well in my "How ridiculously easy wiring is" section, and even in my "Original Laser Brush Instructions" so I don't need to cover that too much again.
In a nutshell, though, it wired "parallel", and it follows this same principle...

...All of the red wires of the diodes are connected together and are then connected to the positive side of the adapter. All of the black wires of the diodes are connected together and then connected to the negative side of the adapter. That's it!
As seen in this picture, I corralled the wires off to each side to make the grouping easier. Also, I have them grouped by row, and the rows are all electrical taped together and wired to the Radio Shack adaptaplug:
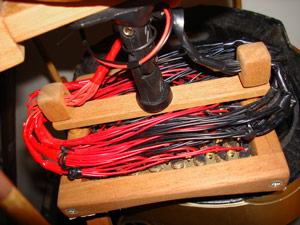
Also, as seen by this back view, I have attached the wires to the back of the helmet by cable clip mounting bases...

That's pretty much it to the construction, but I do have several flaws of this design (flaws that seem to go through varying degrees of importance depending on my particular mood at the time), so lets talk about those so can be spared the same mistakes!
Flaws of My Design...
As you know, my laser helmet has 68 of the 650nm, 5mW diodes set to diffuse the maximum amount they can (to cover the greatest area). However, my fundamental design needs to change a little for maximum effectiveness, and I'll explain...
I'm going to eventually "retire" my current laser helmet design because it has two big flaws for what I wanted to accomplish (I wanted to not only make one solid block of laser coverage, I wanted also to be able to make it an even amount pretty much everywhere on the scalp so I could accurately push it to the 6 joules per square cm mark... and be pretty sure about the amount I was getting for a proper experiment).
The problems of my design are this:
Problem 1) I move the cluster of 68 three times, but the cluster causes overlapping of too great of an area for my taste. That means some areas are getting a lot more exposure than others. This is making it so I have to "back off" the time I would ordinarily do it, because I don't want the overlapping area to get over exposed to the point that no benefits occur (alleged to be somewhere after 10 or so joules per sq. cm.)
Problem 2) I designed the cluster to be adjustable so I could get it a precise, uniform distance from the scalp. What you have to remember about laser exposure -especially diffused lasers- is that it's directly dependent on the distance... twice the distance can equal half the power. What I realized is not only that my helmet slides down a little and the cluster can move a bit over the time I use it, but the cluster itself doesn't match the contour of my head very well. I have to settle on the best position that results in the greatest good for the community (so to speak), but in actuality some of the diodes are practically touching the scalp while some of the diodes are over a couple of centimeters away. Therefore, the amount of power I'm giving my scalp is not even.
Now... does it have to be as even as I want it to be?? Does every square inch of my scalp need to be covered to get benefits?? I'm starting to think that both of those answers are NO... but I still want a more scientific experiment just so I can say "I got X results by delivering exactly Y joules per centimeter over Z time period".
That's why I'm going to change the design at some point and make it so the new cluster is big enough to cover the entire scalp without having to move it (eliminating overlapping areas) and sits on two centimeter plastic "bristles" (so it's a uniform distance over the entire scalp). Unfortunately, that will take exactly 210 diodes total. lol... That's, umm... A LOT!
But this design obviously works, and who knows... I may never change it. If I do... it has nostalgic value to me now, so I won't ever dismantle it!
-O.M.G.

.jpg "The World's Greatest Laser Helmet for Hair Loss")
.jpg)
.jpg "EMFs and Laser Helmets")
.jpg "Lasers vs. LEDs -there is no competition!")
.jpg "Calendar of Laser Therapy Usage")
.jpg "Additional Common Coverage Patterns of the Laser Messiah II")
.jpg "PulseDrive Introduction Video")
.jpg "Common diode patterns for the Laser Messiah II")
.jpg "The Laser Messiah II works WORLDWIDE!")
.jpg "The laser helmet for hair loss that changed the world")
.jpg "Fitting Instructions for the Laser Messiah Video Screenshot")
Comments (0)
Login | Register